He who controls the spice …
I had to take a break from blogging last week due to the Thanksgiving holiday here in the United States, during which I played host to my in-laws for several days of family hijinks to the tune of college football, backyard-fire-pit s’mores, an Eddie Murphy retrospective on BET, and lots and lots of imbibed homebrew. I return with many stories I’ll share in the coming days: a rousing adventure of a non-traditional 3-course Thanksgiving beer dinner, and a saga of a Black Friday brew day so bitter it took six bowls to contain all the hop additions.
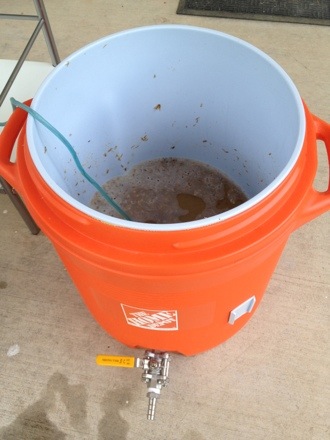
But first, an update on Colonial Progress Ale. After nearly 4 weeks in the fermenter, it’s just about finished with a gravity of 1.007. That’s a bit more attenuation than I expected, so it will be higher in alcohol, but that may not be a bad thing for a winter session ale.
I’m pleased to report that as the yeast slowly flocculates out, it’s leaving the beer with a much cleaner taste than I was getting from it even a week ago. When I sampled it on Thanksgiving, it was fruity and a little sulfuric. Now it’s clean tasting and very dry, with only a hint of mineral flavor from the molasses and a burst of herbal bitterness from the late spice addition of sweet gale and juniper berries.
What’s missing is any sign of herb or spice in the aroma/flavor arena. So today, a few days before kegging, I made a “spice potion” with the remaining sweet gale and juniper berries.
What’s a spice potion? Despite sounding like something from a Dune or Harry Potter book (or some sick and unnecessary crossover that I would nevertheless read because I friggin’ love both those series: Harry Potter and the Floating Fat Baron? House Elves of Dune? I’m looking at you, J.K. Rowling and Brian Herbert) a spice potion is a method for adding spices or herbs to homebrew without boiling – and thus losing many of the volatile compounds that give those ingredients their distinguishing features – and that’s more elegant than simply throwing them in the fermenter.
It’s simply soaking the herbs/spices in distilled liquor to extract the essence. As I understand it, this works because alcohol is a better solvent than water, so more of the flavor and aroma compounds are extracted than in water steeping, and no heat means the subtler characteristics of the ingredient are retained. And since it’s distilled spirit, it’s safe to add to the beer without fear of infection. Any spirit will do. Vodka is common because of its neutral flavor, but depending on the specific ingredient being extracted, I’ve heard of people using rum, tequila, or whiskey (whose name, incidentally, comes from the Gaelic phrase uisce beatha meaning “water of life”, which is also a solution of pure spice essence in the Dune series – and now we’ve come full geek circle).
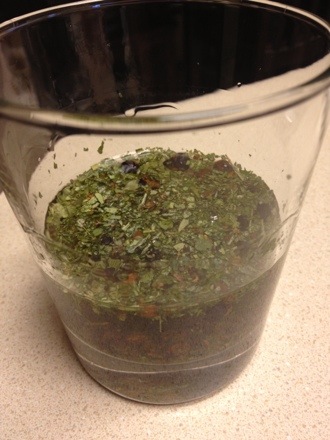
I used vodka. And since quality isn’t really important for the small amount that will end up in the beer, I used the cheapest vodka I keep on hand: the stuff that comes in a 1.75-liter bottle for $9, which I use to fill my airlocks (never for drinking). I muddled a quarter ounce of juniper berries with a gram of sweet gale in a mortar and then placed it in a sanitized glass with about 2 ounces of vodka. The resulting mixture wasn’t pretty to look at, but had an herbal/tart aroma pleasantly similar to gin.
Only the Water of Life will free what can save us.
I’ll let the potion steep, covered with sanitized foil, from now until Sunday. Then I’ll strain out the chunks, add the essence to the keg, and rack the beer on top of that. Since the bitterness is already prominent in the brew, I think this is the last little flavor kick the beer needs to make it ready for prime time.
Watch this space for the next few days as I share my stories from Thanksgiving week. Since there’s no turkey or shopping involved in either of them, I’m sure you’ll enjoy them despite the passage of time.
Until then, keep the spice – and the beer – flowing.
Unfinished business
With November half over, I'm faced with several unfinished brewing projects and more on the way.
A few days ago, I racked my ginger mead to a carboy for conditioning. Because of my pathological aversion to work which isn't absolutely necessary, I'm a believer in long primaries and won't rack beer to a carboy unless there's a damned good reason (no empty keg available, need the primary vessel for a new beer, cat fur stuck to the inside wall of the bucket, etc.) and I get good beer with up to 6 weeks on the yeast cake.
But for mead, we're talking upwards of 6 months of conditioning, and for that there's no way around racking to a carboy. Not only is it better to get the mead off that autolyzing yeast for the extended aging, but it's essential for clarity: the mead won't clarify until it's removed from the gross lees. It's amazing, in fact, how quickly it does start to clarify as soon as it's racked. Just a few days have passed since I racked it, and it's already several shades darker than it was in the primary due to the yeast flocculating out.
At racking time, the gravity measured 1.001 and the mead had a fruity, floral taste with a little ginger bite but sadly no hint of ginger in the flavor or aroma. My fermentation chamber did its job well keeping the fermentation cool, and it had none of the fusel alcohols my other (uncontrolled temperature) meads had this early on. It might even be ready in less than 6 months, but I have reasons for waiting until April to bottle it. Until then, I'll rack it every 6-8 weeks, add a few Campden tablets occasionally to prevent oxidation, and maybe hit it with some Sparkolloid closer to bottling time. And definitely some more ginger before bottling.
I also took the first gravity sample from the Colonial Progress Ale I brewed 11 days ago. The wort turned out a bit more fermentable than I expected and is currently at 1.009, with an ABV of 4.8% (and the WLP008 yeast, a notoriously slow flocculator, might still be working). It's got a fruity tang I expected from this yeast, and very minimal cidery character from the simple sugar of the molasses. It's really a nice easy-drinking session beer that should be very enjoyable when the yeast settles out. The juniper and sweet gale have largely faded, though. I'll add more spices to the fermenter before kegging. Who knows, I might even rack the beer for the occasion.
The next project on the horizon is an inventory cleaning extravaganza! I've got lots of open hop packets from over the course of the past year that I'll use in a beer to be brewed the day after Thanksgiving. I spent some time tonight rubbing hop pellets between my fingers (while watching Moonshiners on Discovery Channel … now those guys are pros) smelling them and even tasting some of them to make sure they were still hoppy and had none of the telltale cheesiness of bad hops. Fortunately, only a half ounce of Warrior left over from February had any distinctive cheesy notes, so back into the freezer it went to keep on aging until it magically changes from “cheesy” to “aged” and I can use it in a lambic. The other open hops made the cut and will be used next week. More on that recipe soon!
Vote for Progress … hops
Saturday was Learn to Homebrew Day in the USA, and today is Election Day. To honor both events, I did what any patriotic and pedantic zyme lord would. I made beer.
I called it Colonial Progress Ale, and it’s something between an English bitter and an English brown ale. “Colonial” comes from the fermentables, adapted from a recipe I envisioned for a colonial-style ale during a trip to Philadelphia earlier this year. I ended up with:
- 6.5 lbs American 2-row
- 1 lb Victory malt
- 8 oz Flaked wheat
- 8 oz Flaked oats
- 1 lb Molasses
Each of these ingredients was chosen for a reason, starting with American 2-row malt as the base. Wheat is common in colonial ale recipes, including one attributed to Thomas Jefferson. Victory and oats I had no historic precedent for, but I added them for body in the finished beer, along with some bready/biscuity flavor (Victory) and silky smoothness (oats) to accentuate the English-inspired malt profile. I mashed at 153°F for medium fermentability, counting on the highly fermentable molasses to dry the beer out.
The mash begins.
Ohhh, molasses. A common ingredient in beer in early colonial Philadelphia (according to a quote from William Penn), I can eat the stuff right out of the jar. But I was nervous about using it after reading John Palmer’s tasting notes ranging from “rumlike” and “sweet” (woohoo!) to “harsh” and “bitter” (ergh). But further research online suggested that harsher flavors were associated with fermenting mineral-rich blackstrap molasses, not the regular unsulphured kind. I went with regular, and added them at the beginning of the boil with high hopes.
The “Progress” part came from the hops: one ounce of 6.6% AA Progress at the 60-minute mark for bittering, and another quarter ounce at 15 minutes for flavor. Progress is a UK varietal related to Fuggle hops, a good choice for English-style ales.
But that wasn’t all I added to the boil. Hops were available to some colonial brewers, but apparently not all that prevalent, so other bittering herbs were common. My original plan was to use horehound, but I realized the medicinal flavor might overpower a low-gravity ale. I thought of rosemary, but was talked out of it by the sages (ha, ha) at Austin Homebrew Supply. I landed on:
- .25 oz Juniper berries (crushed in mortar)
- .5 grams Sweet Gale (dried)
I added the herbs in the last minute of the boil and let them steep during cooling and whirlpool. I may add more later during conditioning.
The wort had an OG of 1.046, a true session ale for the upcoming winter (insert witty apropos Valley Forge reference; I can’t think of one). I pitched the slurry from a 2-liter starter of WLP008 East Coast Ale Yeast – reportedly the Sam Adams house strain – in keeping with the colonial theme. I set the fermentation chamber to an ambient 65-68°F, a little warmer than typical to coax some vintage ester flavor from this low-flocculating yeast.

Fermentation underway after 24 hours.
By this time tomorrow, the future of the United States will be written for the next four years. But regardless of whether my guy wins or not, I’ll have something to look forward to: a beverage in the tradition of the first beers brewed on American soil. Beer has always been a part of American culture, even before there was a United States, and from #1 on down to #44 many presidents have been homebrew aficionados: George Washington, Thomas Jefferson and James Madison were homebrewers and Barack Obama bought a homebrew kit for the White House with his own money. And beer remains one of the few things people can agree on regardless of personal politics.
Don’t forget to vote today, no matter who you’re supporting. Red and blue be damned. We can all party together in the colors of the SRM scale.
The boldness of new beginnings
Foaming with abandon in the Harry Potter closet is a 2-liter Erlenmeyer flask on a stir plate, filled with a starter of White Labs WLP008 East Coast Ale Yeast.

She ain’t pretty, but she’s mah baby.
Anyone reading this who has been using liquid yeast without a starter should jump on the starter train. Seriously. It’s as easy as making a tiny unhopped extract brew, because that’s exactly what you’re doing. Just bring 1-2 liters of water to a boil – higher gravity worts will need bigger starters; see YeastCalc for the volume recommended for your batch – add dry malt extract at a rate of 100 grams per liter and some yeast nutrient if you’ve got it. This will make a wort of 1.035-1.040, which is perfect for a starter regardless of the OG of the batch it’s going in. Boil, cool and pitch the yeast. Ferment for 2 days, then cool in the fridge for at least 24 hours before making the “real” wort. Most of the yeast will drop out when chilled, leaving clear (but vile – don’t drink it) “beer” which should be decanted, leaving behind the yeast cake and just enough liquid to swirl up into a slurry. Pitch and watch the magic happen. If you’ve got good sanitation techniques, making a starter carries minimal risk. The rewards are higher pitching rates and better beer. And it’s so easy, there’s no reason not to.
This starter was pitched with yeast that expired in July. I’ve worked with expired yeast before. The yeast/bacteria blend in my Bacillusferatu Berliner Weisse was expired for ten months before I pitched it, though that was into a 1-gallon test batch of a low-gravity wort intended for souring. This starter is going into five gallons of wort for a very different beer: my long-overdue Colonial Progress Ale, from a recipe slightly modified from one I posted in April. Details forthcoming after I brew it this weekend.
As the photo above shows, the expired yeast is spewing so much krauesen I had to wrap it in a paper towel. The expired yeast are healthy as can be, and that’s no surprise. Sure, the expired vial had no more than about 10% of its original population of viable yeast cells, but so what? Yeast cells are dying every day in every carboy, keg and cask in the world, but fermentation continues. Many homebrewers culture yeast from commercial bottle dregs and make great beer with it. Given enough time, even a few sad, dying yeast cells will get their freak on, reproduce and ferment wort. It’s just that the first generations will be weak and languid, and make lots of foul-tasting byproducts doing it.
The purpose of the starter is to make sure those nasty byproducts end up in a beer that’s destined for the drain, not your gullet … while the real wort gets inoculated with a healthy colony of the naturally selected descendants of those few Saccharomycean pioneers who survived the long winter.
So don’t ever be afraid to use expired yeast. Don’t throw it away. You should be making a starter anyway. For fresh yeast, a starter is a leg up. For expired yeast, it’s a new beginning.
Speaking of new beginnings, best of luck to my friends and fellow writers undertaking National Novel Writing Month (“NaNoWriMo”) this November. The goal is to write 50,000 words of a novel in 30 days: fast, raw, unedited. I’ve done it four of the last five years and made it across the 50k mark each time. But I won’t be doing it officially this year. I’ve got too many short stories I want to work on, and a novel already in progress, and I don’t want to distract myself with something new. But I am using November as an excuse to write every day: a blog post, story, novel chapter, anything. I did catch wind of a blog-centric version (“NaBloPoMo”), but I love my readers far too much to subject you all to a bunch of hurried blog posts on whatever random bullshit I can think of to write about.
What do you mean, too late?
