Bronze Age Fig Beer, Part 2: The Reckoning
In my last post, I described the brew day for my Bronze Age-inspired fig beer, which ended with me pitching a yeast starter made from Dogfish Head Midas Touch dregs. I didn’t have an especially good reason for fermenting this brew with Midas Touch dregs, except for thinking that it would be good luck for my ancient ale experiment. Moreover, it was my first time cultivating bottle dregs, and I didn’t really study up on it that much ahead of time. I was making it up as I went.
I watched the fermenter, counting the hours of the lag phase and waiting for signs of fermentation. 24 hours passed. Then 48. The airlock refused to bubble. I didn’t panic, knowing that the lid on the small-batch fermenter I “made myself” (translate: “bought a 2-gallon pail and drilled a hole in the lid to fit a stopper and airlock” – sorry, I’m not exactly Bob Vila) doesn’t always seal perfectly and gas might be escaping from somewhere besides the airlock.
After three days, I picked up the pail and looked through the translucent wall for krauesen. Seeing nothing, I decided it was time to intervene.
When I cracked the lid, it was like looking at the surface of a dead alien planet. The wort was still and clear, reflecting the concerned look on my face like a pane of amber glass. The only blemishes on the surface were a few bits of fig seed that had started to grow mold. Aside from that, there was no sign that anything was living in there.
The first thing I did was remove the moldy fig seeds with sanitized tongs. Well, no – the first thing I did was drop an F-bomb. Then I removed the moldy fig seeds.
I took a sample of the wort and tested the gravity. It was 1.073, 5 points down from original gravity, which I attribute to the fact that the OG was taken before I added a relatively high volume of lower-gravity starter. In other words, fermentation had not commenced.
I tasted the sample, finding it as sweet as the day I made it. I tasted honey, figs and malt. No alcohol, no bready yeast flavor and no transitional fermentation by-products like acetaldehyde. Fortunately, there was no apparent infection flavor, either: no musty mold taste and no sign of bacterial souring. So it was in stasis, not ruined.
There was really nothing to do except to pitch fresh yeast. I had a packet of Fermentis Safbrew T-58 on hand for exactly this emergency, so I measured out 6 grams and pitched it. I attempted to stir it with my drill-mounted whip to re-aerate the wort, but the drill battery was inexplicably dead (I’ve recently deduced that I have a kleptomaniac poltergeist in the house with an eyewear fetish; perhaps it’s fond of power tools as well). No matter, I closed the fermenter back up and within 12 hours the airlock was gurgling like a freshly risen zombie.
To be honest, I wasn’t that surprised that I didn’t get viable yeast from the bottle. I never did see any definite fermentation activity in either the first or the second stage starter. And the second stage starter had me a little nervous all along. I couldn’t say what was wrong with it, but it never looked right.
What did I learn from all this? Quite a lot, actually. Here are the CliffsNotes:
- Leaving something as important as yeast selection to superstition isn’t going to get us anywhere.
- Read up on new techniques before trying them. Always.
- When winging it, expect setbacks and have a Plan B.
- Trust instinct more when something doesn’t seem right.
- Always check the drill battery the night before it might be needed.
There’s one more thing I learned. This was my first infection ever in four years of brewing. It happened in a wort that contained solid fruit and that I essentially didn’t pitch yeast into for 3 days. And the extent of unwanted microbial growth was two mere spots of mold on floating fig seeds, nothing more. That’s evidence that my sanitation practices are legit. I’ll drink to the knowledge that I’m doing something right.
Brew in a Bag: Bronze Age Fig Beer
I finally brought to life my Bronze Age Fig Beer, inspired by archaeological findings at Kissonerga-Skalia in Cyprus, in a small-batch brew day that had me flying by the seat of my pants from start to finish.
For small batches, I use the “Brew In a Bag” (BIAB) technique described in the October 2012 issue of Brew Your Own magazine, and also online here. The mash is done directly in the kettle with the grist contained in a nylon mesh bag. BIAB is great for the all-grain brewer looking to save time on brew day, because there’s no sparge. Lautering is as easy as lifting a bag of wet grains (which can admittedly be heavy, if like me, the only workout you get regularly is the ol’ 16-ounce curl). It’s also a great way for extract or partial mash brewers on a budget to explore all-grain brewing without expensive new equipment: just a brew kettle and the same mesh bag you may already be steeping grains in.
Most BIAB brews call for all the brewing liquor up front. The result is a very thin mash – 4 qts/lb in my case – but once the saccharification is done, the bag comes out and the wort can be brought to a boil immediately without sparging. Efficiency suffers, but this can be compensated for with a little extra grain. BIAB works for any batch size, provided the kettle is big enough for the grist and full volume of liquor, but I personally keep it to small batches. This batch was 6 quarts.
The Bronze Age brewer didn’t have a lot of specialty grains to choose from, so I kept my grain bill simple. The only specialty grain was German rauch malt, included to replicate the smoky flavor of malt kilned in a wood-burning oven in a small Bronze Age structure:
- 2 lbs 2-row malt
- 8 oz rauch malt
I mashed in with 10 quarts of water to stabilize the mash at 155 degrees and mashed for an hour, with the kettle wrapped in towels to retain heat. I still had to fire the burner a few times to keep the mash temperature high enough. If you do this, make sure to either take the bag out while the burner is on, or place a plate at the bottom of the kettle to dissipate the direct heat. Nylon mesh bags melt very easily.

Every man should learn how to roll and tuck his bag to keep it safely away from open flames.
Fresh figs are hard to find right now, so I bought dried figs in bulk from the local Whole Foods. I chopped 4 oz, leaving me with a sticky knife, and added them to the kettle to boil for 60 minutes to develop flavor and brown the sugars.

I meant to say really sticky.
Hops were not used in barley beer until the 11th century CE, so I didn’t use any. Instead, I delved into a fantastic book called The Flavor Bible for inspiration on bittering ingredients that might go well with fig. I settled on a quarter ounce of dried bitter orange peel (a traditional ingredient in Belgian witbiers, and available at most homebrew shops) and 7 sprigs of fresh thyme, and added these to the boil with 5 minutes left, along with another 1.5 oz of chopped figs.
Before boiling, the gravity was a measly 1.026, which would likely have boiled down to something in the 1.030-1.040 range. That’s fine for a session beer, but not for a rustic brew worthy of an ancient Cypriot warrior. To raise the potential alcohol, I added a pound of wildflower honey at flameout. According to Patrick McGovern’s Uncorking the Past (another fantastic book), many ancient brews were “grogs” made by mixing fermentable sugars – malt, grapes, honey, other fruits – so I was still channeling my Bronze Age forebears here, though this could technically qualify as a “braggot” by modern standards.

Straining out the chunky bits.
When all was said and done, with sugars from malt, figs, and honey, the wort at pitching time was 1.078, a fairly big brew. I pitched a 600 mL starter made from Dogfish Head Midas Touch dregs I cultivated from a bottle.

The offering, prepped and ready for sacrifice.
Would the ancient brew gods reward my efforts with the dulcet tones of a gurgling airlock? Find out in my next update.
Cultivating bottle dregs
UPDATE NOTE: This post describes a failed attempt at cultivating bottle dregs. If you’ve found this page looking for information on how to cultivate bottle dregs for pitching into beer wort, thank you for reading but please do not follow my process below. It didn’t work for me, as you can read in my follow-up here.
After deciding to brew a Bronze Age-inspired fig beer, I quickly went to work on the recipe in the hopes of brewing it on Monday (which I have off from my day job). It’ll be a 1-gallon experiment batch, with 2-row barley and rauch malt for that Bronze Age kiln-smoked flavor. Bitter orange peel will feature as a flavoring, and I haven’t decided yet whether it’ll have minimal hops or none. Honey and figs will round out the flavor and provide additional fermentable sugar. For yeast, I plan to cultivate a 2-step starter from the dregs in a bottle of Dogfish Head Midas Touch.
I’ve never cultivated a starter from bottle dregs before. Why now, and why Midas Touch? One usually hears about brewers cultivating dregs from sour beers like Orval to harvest the unique blend of Brett and bacteria strains that make those beers special, as described in this blog entry from TheMadFermentationist.com. But it should work with clean Saccharomyces as well.
I’m not sure what kind of yeast is used to ferment Midas Touch, though clone recipes online call for Trappist ale strains. I don’t even know if the yeast Dogfish Head bottles Midas Touch on is the same as the yeast that ferments it – many breweries use different yeasts for bottle conditioning. So my decision to use Midas Touch dregs was less about capturing a particular unique yeast than it was about superstition.

9 out of 10 prehistoric shamans agree: Consume your totem’s essence to gain its power.
Midas Touch is one of Dogfish Head’s “ancient ales” and is based on chemical analysis of bronze vessels found in Gordion in Central Turkey – roughly the same part of the world as Cyprus, where my fig beer has its inspirational roots. I thought the dregs might be a good luck charm for my first foray into ancient brewing: a little piece of the magic from Sam Calagione and Dr. Patrick McGovern, two of the high priests of modern ancient ale reproduction. But really, the main reason I did it was because it sounded like fun and I’ve never done it before.
I made a first-step starter wort of 200 milliliters to bring the bottle yeast back from the dead. When that ferments out, I’ll “step it up” to a second starter of 500 mL. For a full 5-gallon batch I’d continue stepping up to 2 liters, but for a 1-gallon batch, 500 mL should suffice.
I scaled down my usual starter process as well as I could, realizing it’s okay if some the math isn’t exact in a wild-shot experiment. I dissolved 15 grams of extra light dry malt extract in 200 mL of boiling water. Usually I use 1 gram per 10 milliliters, but I’m hoping the lower OG starter will give a little advantage to sleepy yeast.
I also added 3/32 of a teaspoon of yeast nutrient. While that sounds like a strange fraction to use, it’s simply one each of the “pinch” and “smidgen” measuring spoons (or 3 “smidgens”) available at specialty kitchen stores. Those little spoons aren’t all that useful on a day-to-day basis, but I keep them around just for tiny measurements like this. For the record, an exact scaling of my usual 1/2 teaspoon nutrient per liter of starter would have been 1/10 teaspoon.

It was almost too small to boil on the stovetop.
5 minutes of boiling reduced the starter volume more than expected, so after I cooled it and transferred to a sanitized pint glass, I topped off with pre-boiled water and chilled in the freezer to an acceptable pitching temperature of 84°F. I roused the yeast in the last half-inch of a bottle of Midas Touch (which I had already poured into a glass and was drinking) and pitched it.

Ready for the stir plate.
As of today, there’s no visible sign of fermentation in the starter, but there is a pleasant boozy smell coming from the glass. There’s no telling how few viable yeast cells were in that bottle, but even a few cells should reproduce given time.
We’ll see how it shakes out by Monday. I never do anything too crazy without a safety net, so I have a packet of Fermentis Safbrew T-58 – a spicy Belgian yeast strain with reported clove notes, which should go well with honey, fig and smoke – on hand just in case I don’t get a usable starter. But that’s Plan B.
Here’s hoping the Bronze Age beer gods smile on my undertaking.
Brewing like a Bronze Ager
In the latest podcast episode of Basic Brewing Radio (“Bronze Age Brewing”, aired January 3, 2013) host James Spencer interviewed Ian Hill of the Heritage and Archaeological Research Practice based in the UK, about an ancient “microbrewery” structure discovered by University of Manchester archaeologists at the Bronze Age settlement of Kissonerga-Skalia, near the modern city of Paphos in Cyprus. A link to the story on the Telegraph’s website is below.
Bronze age ‘microbrewery’ discovered in Cyprus
The structure is dated to around 1600 BCE, and included an oven the archaeologists believe was used as a malting kiln, mortars for manual grain crushing, a hearth and clay pots. And you thought your drill-powered malt mill and 60,000-BTU propane burner constituted a bare-bones brewing system …
The conclusion that the structure was a malthouse/brewery came mostly through process of elimination, as Hill explains in the podcast. Some barley was found nearby along with fig seeds, which suggests a barley-based beer, perhaps with some smoked malt flavor as an accidental result of the kiln being contained in such a small space – a theory supported by smoky residue on the walls of the structure. The figs may have been a flavor additive, or may have been added to the wort to start fermentation via the introduction of wild yeast living on the figs’ skin.
Hill went on to explain how in August of 2012, he and some others on his team reconstructed the structure offsite to try malting some grain using the Kissonerga-Skalia setup, then brewed some beer with the grain they malted.
They made several batches with different parameters. Mash thicknesses varied, but the thinnest was 7 liters per kilogram of grain, which works out to 3.36 qts/lb, a thin mash but well within the range of no-sparge “Brew in a Bag” techniques. They doughed in at 70°C (158°F) and kept the mash temperature above 65°C (149°F): pretty typical mash. Although the Bronze Age beer probably was not boiled, Hill’s team boiled theirs to sanitize it. They did not add any hops.
They pitched one batch with crushed figs to emulate the wild fermentation technique speculated for the ancient beer. A second batch was pitched with grapes (also a source of wild yeast) instead of figs. A third batch was fruit-free and pitched with brewer’s yeast as a control. I won’t spoil the results – the podcast is short and fun, and completely worth listening to.
Idea time. I’d like to take the plunge into making an “ancient” beer of my own. I’m a history lover – the older the better – and like the idea of getting in touch with my ancient brewer ancestors by trying out their ingredients and techniques. Patrick McGovern’s book Uncorking the Past: The Quest for Wine, Beer, and Other Alcoholic Beverages is an inspiring read, and I love the work he’s done with Dogfish Head on beers like Midas Touch and Chateau Jiahu. But until now I haven’t had the motivation to get off the fence and dive in with an ancient recipe of my own.
Until now. The figs are speaking to something deep in my soul. Maybe it’s because at Christmas, someone in the family raided the canister of my aunt’s famous Italian fig cookies before I could, and I’ve been craving them ever since. And my recent introduction to historical brewing – Colonial Progress Ale – ended up tasting pretty damn good and has gotten great reviews from friends. I’m feeling ambitious.
So I’m going to brew a Kissonerga-Skalia beer with some smoked malt. I don’t think I’ve got the figs to do an all-wild fermentation, but I would like to try cultivating dregs from a bottle of Midas Touch. And I will use some fig somewhere in the brew for flavor and additional sugar. It sounds like a good spring beer, so that gives me between now and early February to put together a recipe.
In the meantime, I’ll remember a quote from Ian Hill in the podcast that stuck with me: “Archaeologists love their beer, so it’s not a bad thing to find.” Indeed.
From the Cellar: an Auld Lang Stout
With highland-like winter winds dropping the temperature outside to near freezing and the tune of “Auld Lang Syne” still in my head, it’s no surprise that my thoughts turned to Scotland for my first cellar beer of 2013. My attention was captured by a couple of bottles from BrewDog that I’ve been cellaring for the better part of a year.
I consider myself a BrewDog fan. Based in northern Scotland, they’ve earned a reputation for extreme beers. Three of their beers – Tactical Nuclear Penguin, Sink the Bismarck!, and The End of History – were freeze distilled to achieve ABVs of 32%, 41%, and 55% making each the “strongest beer ever made” at the time it was released. I stopped into their brewpub in Edinburgh twice while visiting the UK in 2011 and tried both Tactical Nuclear Penguin and Sink the Bismarck!. Served at a premium price in tiny pours (I believe they were 50 mL, not quite 2 ounces) and made for sipping, they weren’t drinks I would ever reach for when I wanted a “beer”, but they were enjoyable, unique and worthy of the recognition they received worldwide.
But BrewDog’s history of record-chasing hasn’t brought them unanimous appreciation at home. They’ve courted controversy, been targeted by industry watchdogs, and feuded with London-based international beverage giant Diageo. A couple of UK natives I’ve spoken to have even told me they didn’t appreciate BrewDog bringing American-style brewing excess to the British Isles, though their growth and success suggest that’s a minority opinion. In any case, from here in the USA – where excess in brewing often manifests itself through the same old tricks: higher gravity, more hops, stranger microbes, etc. – BrewDog’s innovative excess looks very original to me, and I’m glad they’re in business.
A 12-ounce bottle of BrewDog Paradox Isle of Arran Imperial Stout, barrel aged in scotch whisky barrels and 10% ABV, sounded perfect to stave off the cold. I put it in the fridge for a few hours to chill slightly and served it up.

The beer poured almost black, with chocolatey brown hues showing when the light hit the pouring beer just right. It didn’t pour nearly as thick or syrupy as I expected it to, suggesting a thinner body than many other imperial stouts. Once in the glass, it was tar black with no head.

The aroma was strong with scotch whisky at first, and burned my nose a little. As I continued to sniff, it faded to a barleywine-like booziness with raisin and black cherry notes along with blackstrap molasses and mouthwatering caramel.
Strangely, the flavor was very mellow – a bit too much so. I tasted more raisin than anything, with a little oaky whisky flavor underneath but very little indicative of an imperial stout; it tasted more like a very dark English old ale. As the beer warmed to room temperature, a little bit of roasty stout character emerged, but not enough to balance the whisky notes. And as the pour suggested, the beer was very thin, with very little residual sugar to hold up the whisky and raisin notes.
I suspect that I aged this beer too long, which is a shame. It didn’t taste stale, but was unbalanced, as though some flavor notes faded faster than others. For a brewery known for extreme beers, this one came across as soft in the wrong ways. But I won’t fault BrewDog for that. I’d love to buy another bottle and try it again someday, but it seems the Paradox line has moved on to other things.
Whatever is next, I’ll be watching.
Crystal malts in IPA: the wisdom of Mitch Steele
In my recent review of Stone Enjoy By 12.21.12 IPA, I mentioned that I enjoyed it a lot, but was surprised that it had “less melanoidin flavor than I usually want from an IPA.”
Here’s an interesting postscript and mea culpa. I just listened to a Basic Brewing Radio podcast released December 13, in which Mitch Steele, head brewer at Stone Brewing Company and author of a new book IPA: Brewing Techniques, Recipes and the Evolution of India Pale Ale (which I received for Christmas, and it looks like a great read) advocated:
minimizing use of crystal malts in IPA, [which] adds a level of sweetness and malt intensity that [can] kind of mask the hop character … as the beer ages, the crystal malt immediately turns into that dried raisin, fruit character which really knocks the hop character down.
He recommends rye, wheat, or even light Munich malts as a substitute, and says he prefers these malts to crystal in his own IPA recipes. He said that Stone doesn’t often use rye particularly in their beers due to lautering concerns with their brewhouse equipment, but he would like to.
I was always under the impression that crystal was more or less a necessity in IPA, to add exactly the kind of residual sweetness that Steele cautions against. Far be it from me to disagree with him, because he literally wrote the book on IPA, and Stone’s selection of great IPAs speaks for itself. I’ve deduced that Mr. Steele practices what he preaches, and the grain bill for Enjoy By IPA – a beer he had significant creative control over as head brewer – contained little, if any, crystal malt.
It was that sweetness of crystal malt that I was expecting to find in Enjoy By IPA and missing (well, maybe not “missing”, because the beer was spectacular). I incorrectly identified it as a lack of melanoidin flavor, when it was actually a lack of caramel flavor. Caramel flavors come from using stewed, sugary crystal malts (also known as caramel malts; surprise, surprise) in beer. Melanoidins, on the other hand, are the toasty flavors associated with German beers that one gets from decoction mashing and boiling malts such as Vienna and Munich.
Assuming Enjoy By IPA had Munich in its grain bill and not crystal – as per Steele’s own advice – what I was probably tasting was melanoidin. Or at least a subtle, barely detectable background of melanoidin that allowed the hops to take center stage; as opposed to caramel flavors competing with hops for the spotlight in the name of balancing bitter and sweet.
Maybe that’s exactly what Mitch Steele realized, leading him to his decree. If so, I like his style; and I’m going to learn from it. My last IPA had 1 pound of crystal malts compared to 1.5 pounds of Munich, a 2:3 ratio. How much better would the hops taste if I changed that 8 oz of crystal and 2 pounds of Munich (1:4)? Or only 4 oz of crystal (1:8)?
The real tragedy is that December 21 has come and gone, and I won’t be able to find Enjoy By 12.21.12 IPA again. If I do, it’ll be past date. It seems kind of heretical to drink a beer called “Enjoy By 12.21.12” after the date on the label, doesn’t it?
This will be my last post of the year. Happy new year from the Zyme Lord, and I’ll see you in 2013.
Baggings! We hates it forever!
My Hobbit-inspired Old Took’s Midwinter IPA is now in the keg. If it seems like that happened really quickly, it’s only because of how late I posted my blog post about the brew day. I fermented it for three weeks before dry hopping it for 6 days. All in all, it was about 4 weeks from mash tun to keg.
I dry hopped it with an ounce each of the same finishing hops I used in the boil, hoping to achieve a nice mix of floral and citrus aroma notes to round out the beer:
- 1 oz Willamette (4% AA)
- 1 oz Cascade (6.2% AA)
It’s been in the keg for less than a day, so it’s too early to know for sure how it’s going to turn out. It tastes good, and it’s got more hop character than it did a week ago. So I think it’s going to be good, but I’m a little concerned that this wasn’t my most successful attempt at dry hopping.
In the past, I’ve dry hopped with pellets either tied in a disposable loose-weave muslin bag, or tossed into the fermenter loose. I prefer loose over bagging if possible for maximum contact, but hop particles in the keg are a problem with more than about a half ounce of hop pellets. With 2 oz of loose pellets, I’d be serving up pints of hop debris for a month.
I didn’t have any muslin bags on hand, nor any time to go to Austin Homebrew Supply to buy any. Searching local retailers for a solution, I came across these spice bags at a kitchen store. They’re for chefs making bouquet garnis, but they are muslin (a tighter weave but still porous), and they are advertised as reusable. The biggest drawback I could see was that they were smaller than the bags I usually use, but since I got 4 in a pack I figured I’d use several.
When bagging dry hops – or when using a tea ball-type infuser, which is also popular – the size of the bag or ball is important. Hops shouldn’t be packed too tightly or else you reduce the surface area in contact with the liquid, which decreases the amount of hop goodness that gets into the beer. After sanitizing the bags with boiling water, I split up my 2 oz of hops into 3 bags along with sanitized marbles for ballast. Two thirds of an ounce per bag seemed to provide lots of breathing room, although I knew the hops would expand a little.
I didn’t count on just how much they would expand.
After I racked the beer into the keg, I found my 3 muslin spice bags at the bottom of the fermenter. The hops had expanded so much the bags looked about to burst, like overstuffed pillows. I didn’t worry about it too much until I was cleaning the bags out, in the hopes of maybe reusing them someday. As I emptied the bags into the kitchen sink, I inhaled deeply, smelling the rich, floral-citrus bouquet coming from the green sludge washing down the drain.
And then it hit me: that’s hop aroma going down the drain. Not in my beer.
The hops expanded so much in those small bags that they ended up packed too tightly. Some of the available hop compounds got into the beer, but not all. So the beer is better than it was, but not as good as it could have been. Should have been. And I’m left feeling disappointed at the waste. A spontaneous decision potentially compromised the end result, and that’s going to bother me until I taste the chilled, carbonated beer and know for sure.
If only I had just used my usual bags! Or something else – anything else!
I should breathe deep and repeat the mantra of Charlie Papazian: Relax. Don’t worry. Have a homebrew. Even if the IPA isn’t perfect, I haven’t ruined it. It’s far from the worst disaster ever to befall a homebrewer, and it’s certainly not the worst thing I’ve faced. Yes, it was avoidable and it’s annoying, but the beer will be fine.
Then from the back of my brain comes a nagging: Is “fine” really good enough?
It’s not beyond repair. I can still add more dry hops to the keg, if needed. And I probably will. But I’ve learned my lesson. I’m sure I’ll find many other uses for these spice bags in the brewery, such as infusing dry herbs that won’t expand. But I don’t think I’ll be bagging dry hops in anything smaller than a nylon stocking in the future.
From the Cellar: December, bomber by bomber
I have an ever-growing collection of 22 oz and 750 ml bottles of beer cellaring in the Harry Potter closet. I save them for interesting meal pairings or other special occasions (which includes “another Sunday”). So December – a time of parties, good meals, multiple Christmas celebrations and the new year – is a perfect time to catch up on the cellar back stock. By which I mean drink them, of course.
It’s also when a lot of breweries release special beers, so I’ve found a few to fill the empty spaces in my cellar as I drink them up. Here’s a quick review of some recent bombers I’ve tasted and bought, and a preview of what I’m uncapping next.
This past Saturday, I opened a Stone Enjoy By 12.21.12 IPA. The occasion? Nothing more than resting up after seeing The Hobbit twice on Friday, and a December evening warm enough to put some filet mignons on the backyard grill. Steak and IPA aren’t two things I pair often, especially not when the steak is seasoned boldly (I used some coffee-chipotle rub left over from Thanksgiving), but time was running out on this time bomb of a bomber. The spicy beef and spicy beer matched better than I expected. The beer was light in color, with less melanoidin flavor than I usually want from an IPA, but I didn’t mind the hops overtaking the light malt profile. It was fresh, grassy, floral and spicy. Like a morning stroll through an English garden in spring. With a steak.
Then on Sunday, my wife Lisa and I had an early “Christmas” dinner: leg of lamb with garlic, lemon and herbs, which I paired with a bottle of Boulevard Collaboration No. 3 – Stingo that I’ve had for several months. Not knowing anything about “stingo” – a strong English style – except what was on the label, I expected deep malt and spice with a hint of sour tartness. I thought it would be a natural pairing for lamb with a little tangy mint sauce, but I was disappointed. There was some malt roastiness and a tang on the finish, but nothing in between. Not enough malt backbone, not enough depth, and not enough sourness to be pleasant. I had a lot of trouble finishing it, and that’s the first time I can say that about a Boulevard beer. Realizing it had been in storage for a while, I checked the date on the label, and it wasn’t out of date. Just not my thing, I guess.
I also bought a few new beers for my collection: a Stone 12.12.12 Vertical Epic Ale, a Brooklyn Black Ops, and a Samuel Adams Thirteenth Hour. I predict at least 2 of those won’t live to see spring.
Speaking of not living to see spring, this Friday night (December 21) I’ll open a bottle of Dogfish Head Theobroma in honor of the winter solstice and the end of the Mayan calendar. Since “theobroma” (a.k.a. cacao) is the food of the gods, this should be an excellent way to gain favor with Bolon Yokte K’uh, the Mayan god of war and creation who might be coming to destroy us all. If he is not amused and punishes me for my insolence – or if, more likely, he forgets to show up and the world continues to turn – at least I’ll be enjoying one of my favorite beers.
Saturday morning, assuming we’re alive and not already on the Dark Rift road to the Mayan underworld Xibalba, we drive to New Orleans to spend Christmas with our families there. I’m bringing a couple of bottles of Samuel Adams Norse Legend Sahti for Christmas Day. I haven’t tried it yet, but it should be something interesting to introduce to non-beer geeks in the family. The label might even open up some geeky discussion about Norse mythology, which I recommend highly as an excellent conversation topic, especially over grandmother’s Christmas lasagna.
Then there’s a bottle of Samichlaus Bier Helles which won’t see any action until New Year’s Eve. January 1 is Lisa’s birthday, and this year she can’t drink to celebrate thanks to our bouncing, kicking bun in the oven. So we’re having a small celebration at home starting on New Year’s Eve. Samichlaus, a rare Helles bock brewed only once each year by Brauerei Schloss Eggenberg in Austria, will be a fitting send-off to 2012: a very special beer for a very good year.
A Hobbity, Hoppy Midwinter IPA
I’ve written before about keeping it simple in homebrew recipes. Today I’m doing the opposite. I’m sharing a recipe with a lot of bits and pieces, but for a good reason.
Over the course of 2012, I accumulated several open packages of leftover hop pellets. Hops begin degrading as soon as they are opened and exposed to air, and although this degradation can be slowed by storing them frozen in a Ziploc or vacuum-seal bag, that won’t preserve them indefinitely. It’s recommended to use open hops within about 6 months, after which they start to lose their bittering potential day by day as the alpha acids break down.
Of course, it’s not an all-or-nothing deal: it’s not like they’re perfectly okay to use on day 180 and then bad on day 181. As long as they don’t smell funny – like cheese or feet – hops older than 6 months can be used, but the alpha acid degradation (i.e., decreased bitterness) should be taken into consideration for recipe balance and IBU calculation. Fortunately, many brewing programs – like my favorite, BeerSmith – have tools for calculating the effective alpha acid potency of old hops.
So I spent an evening sampling old hops to see how they were holding up, and was surprised to find that the oldest hops in the freezer weren’t the worst ones. For instance, some Saaz and Citra open since 2011 were perfectly fine, but a packet of Warrior from February 2012 was thoroughly becheesed. I separated the good from the cheesy and used BeerSmith to calculate the adjusted AA of the good hops so I could use as many of them as possible in a winter IPA. In homage to new The Hobbit movie coming out this week, I called it Old Took’s Midwinter IPA after Bilbo Baggins’ maternal grandfather, whose memory inspired Bilbo to embrace his adventurous side.
I brewed it on Black Friday in the company of my visiting male family while the ladies were at the outlet mall, which seemed like a great way to show my British brother-in-law (a pub operator who knows a thing or two about a good pint) how we do IPA here in the States.
The grain bill is below. I mashed at 152°F for an hour:
- 12 lbs 2-row malt
- 1.5 lb Munich malt
- 1 lb Victory malt
- 8 oz Crystal 40L
- 8 oz Crystal 60L
- 8 oz Rice Hulls (for efficiency & sparging)
But who am I kidding? The hops are what we’re really interested in here. First up, the oldies but goodies. I’ve noted both the original AA of all the hops below and the adjusted AA, based on BeerSmith’s calculations:
- 0.25 oz Nugget (12.4% orig AA, 11.4% adj AA) for 60 min
- 0.5 oz Saaz (3% orig AA, 1.84% adj AA) for 60 min
- 0.5 oz Falconer’s Flight (11.4% orig AA, 10.4% adj AA) for 45 min
- 0.5 oz Citra (13.6% orig AA, 11.73% adj AA) for 45 min
That was it for the old hops, and I kept them near the beginning of the boil. The reason being that if there were anything unpleasant about them after all this time, it was better to use them early on for bittering, instead of later in the boil when hops contribute more flavor and aroma. Based on my smell/taste tests, it probably would have been fine, but I didn’t want to take the chance.
I also used some fresh hops, mostly (but not all) after the 45-minute mark:
- 0.5 oz Warrior (16% AA) for 60 min
- 0.25 oz Cascade (6.2% AA) for 30 min
- 0.25 oz Willamette (4% AA) for 30 min
- 0.25 oz Cascade (6.2% AA) for 15 min
- 0.25 oz Willamette (4% AA) for 15 min
- 0.25 oz Cascade (6.2% AA) for 5 min
- 0.25 oz Willamette (4% AA) for 5 min
- 0.25 oz Cascade (6.2% AA) at flameout
- 0.25 oz Willamette (4% AA) at flameout
Measured and organized into each addition, all those hops made a pretty picture on my kitchen island:
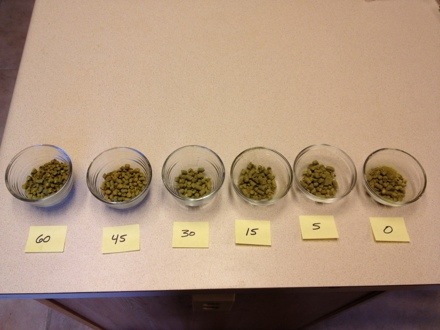
My first photograph that’s a true work of art. I call it “Oscar Charlie Delta”.
The OG was 1.070 and I pitched 15.1 grams of rehydrated Safale US-05 yeast. I set the fermentation chamber to an ambient temperature of 63-66°F and it took off like a rocket within about 12 hours. It fermented very actively for about 8 days before settling down, and once I take gravity readings to ensure fermentation is done, I’ll add more Cascade and Willamette dry hops later this week.
If I had any doubts lingering in the back of my mind about using old hops, they were put to rest when I tasted the wort sample I took for my OG reading. It was sweet and biscuity, with a burst of multicolored floral/herbal bitterness, complex and layered as one might expect from so many hops. Tasting how much life was still left in those old hops, I was reminded of the last line spoken by old Bilbo Baggins in Peter Jackson’s film of The Return of the King when, aged and frail but still spirited, he looked out over the sea to the west and said, “I think I’m quite ready for another adventure.”
