Une saison à la maison
Saison.
In French, the word means season, as in the seasons of the year. Spring, summer, autumn, or winter. A generic term, a category with specimens so varied that each is the opposite of another.
Perhaps it’s no coincidence that the beer style we call “saison” is a varied, open-ended style as well. Call it a seasonal beer unattached to a particular season.
Okay, that’s not entirely true. Look it up anywhere from Wikipedia to the BJCP Style Guidelines, and you’ll learn that saison has its roots in the farmhouses of the French-speaking Walloons of Belgium who spent the winter brewing spicy, refreshing ales to be consumed in the summer by workers pulling long shifts in the fields. So traditionally it’s a summer beer.
But the Wallonian brewing tradition was highly improvisational and localized. Each farmhouse brewed their own beer with the ingredients available at the time, often raised on their own farms. The resulting beers were, unsurprisingly, vastly different from place to place and from month to month.
So unlike the seasonal beers of, say, Germany – which tend toward profile standards of characteristic Teutonic rigidity, with names easy to mark on your calendar like Märzen, Maibock, and Oktoberfest – this traditional Belgian seasonal can be light or dark, strong or sessiony, and anything in between. A December 2006 Style Profile article from Brew Your Own magazine lists a wide disparity of characteristics for the modern style in regards to color, mouthfeel, residual sweetness, strength, hop profile, and spices. The main common thread is the yeast, descended from traditional Belgian strains that produce a characteristic spiciness, an estery je ne sais quoi that makes these beers decidedly farmhousey, even when made in the (sub)urban backyard.
With that range of profiles, I’d say seasonality goes out the window. A strong, dark, spicy saison would be a great nightcap on a cold winter night. I like light, refreshing saisons in spring (I’m pretty sure spring in Texas feels like summer in Belgium anyway). So I brewed one now to be ready by the last week of March.
There was another reason for my timing besides the oncoming vernal equinox. The last beer my wife and I drank together was a bomber of Brooklyn Sorachi Ace, the day before we learned she was pregnant. Our baby is due in April, so what better beer to have on hand to celebrate her return to the world of the ethanol-metabolizing than a hop-forward saison?
I started my brew with a clone recipe of Brooklyn Sorachi Ace from the December 2011 issue of Brew Your Own and a Gallic sense of laissez-faire. The recipe called for 11 lbs (5 kg) of Belgian Pilsner malt, which I increased to 11.75 lbs (5.33 kg) to compensate for lower efficiency on my system (more on that below). This made up the bulk of the fermentables along with 1 lb (453 g) of dextrose in the boil. The recipe also used a 3-step mash, which I did not. I did a single infusion mash at 146°F (63°C). The low mash temperature makes a more fermentable wort, but saccharification takes a little longer so I mashed for 90 minutes instead of my usual 60.
Brooklyn Sorachi Ace is hopped entirely with Sorachi Ace hops, which I couldn’t get locally. Instead of replacing it with a similar substitute, I took a different path entirely. I used 16% AA Warrior hops for neutral bittering, two additions of .37 oz (10.5 g) each at 60 and 30 minutes (~6 AAU in each addition). At flameout, I added 3 oz (85 g) of 15% AA Summit.
I had prepared a 2-liter starter of White Labs WLP 560, an Austin Homebrew Supply-exclusive Classic Saison Yeast Blend. That starter was decanted and pitched into a wort with an OG of 1.073, eleven points higher than my target OG of 1.062. Eleven points!

Not your grand-père’s farmhouse brewery.
Little mishaps are common in brewing, and usually a good sign. Minor, easily correctable problems during the brew day keep the brewer on his/her toes, and (I think) make us less prone to serious mistakes that can’t be fixed. But overshooting target gravity by this much is a new kind of problem for me.
Is it even a problem? Obviously my efficiency is much higher than I thought – I’m noting the data for future batches – and the extra malt I added was unnecessary: a “problem” many brewers would love to have. I’m not entering any contests, so the fact that my OG landed past the upper limit of the BJCP range for saison doesn’t concern me. If it fails to attenuate completely, I may end up with a beer that’s too sweet. But if I got the kind of fermentability I was shooting for out of my low mash, that extra sugar should ferment out, leaving me with an ABV higher than I intended.
So if I’m lucky, I’ll be welcoming the spring with a dry, high-alcohol saison. Maybe it won’t be strong enough to qualify as an “imperial saison”, but it should be worthy of some noble title. I’d settle for “ducal saison” or better yet, “marchional saison”. With its extra kick, it might be a little too intense for farm work, but it sounds about right for celebrating the birth of a new Marchese.
Brew in a Bag: Bronze Age Fig Beer
I finally brought to life my Bronze Age Fig Beer, inspired by archaeological findings at Kissonerga-Skalia in Cyprus, in a small-batch brew day that had me flying by the seat of my pants from start to finish.
For small batches, I use the “Brew In a Bag” (BIAB) technique described in the October 2012 issue of Brew Your Own magazine, and also online here. The mash is done directly in the kettle with the grist contained in a nylon mesh bag. BIAB is great for the all-grain brewer looking to save time on brew day, because there’s no sparge. Lautering is as easy as lifting a bag of wet grains (which can admittedly be heavy, if like me, the only workout you get regularly is the ol’ 16-ounce curl). It’s also a great way for extract or partial mash brewers on a budget to explore all-grain brewing without expensive new equipment: just a brew kettle and the same mesh bag you may already be steeping grains in.
Most BIAB brews call for all the brewing liquor up front. The result is a very thin mash – 4 qts/lb in my case – but once the saccharification is done, the bag comes out and the wort can be brought to a boil immediately without sparging. Efficiency suffers, but this can be compensated for with a little extra grain. BIAB works for any batch size, provided the kettle is big enough for the grist and full volume of liquor, but I personally keep it to small batches. This batch was 6 quarts.
The Bronze Age brewer didn’t have a lot of specialty grains to choose from, so I kept my grain bill simple. The only specialty grain was German rauch malt, included to replicate the smoky flavor of malt kilned in a wood-burning oven in a small Bronze Age structure:
- 2 lbs 2-row malt
- 8 oz rauch malt
I mashed in with 10 quarts of water to stabilize the mash at 155 degrees and mashed for an hour, with the kettle wrapped in towels to retain heat. I still had to fire the burner a few times to keep the mash temperature high enough. If you do this, make sure to either take the bag out while the burner is on, or place a plate at the bottom of the kettle to dissipate the direct heat. Nylon mesh bags melt very easily.

Every man should learn how to roll and tuck his bag to keep it safely away from open flames.
Fresh figs are hard to find right now, so I bought dried figs in bulk from the local Whole Foods. I chopped 4 oz, leaving me with a sticky knife, and added them to the kettle to boil for 60 minutes to develop flavor and brown the sugars.

I meant to say really sticky.
Hops were not used in barley beer until the 11th century CE, so I didn’t use any. Instead, I delved into a fantastic book called The Flavor Bible for inspiration on bittering ingredients that might go well with fig. I settled on a quarter ounce of dried bitter orange peel (a traditional ingredient in Belgian witbiers, and available at most homebrew shops) and 7 sprigs of fresh thyme, and added these to the boil with 5 minutes left, along with another 1.5 oz of chopped figs.
Before boiling, the gravity was a measly 1.026, which would likely have boiled down to something in the 1.030-1.040 range. That’s fine for a session beer, but not for a rustic brew worthy of an ancient Cypriot warrior. To raise the potential alcohol, I added a pound of wildflower honey at flameout. According to Patrick McGovern’s Uncorking the Past (another fantastic book), many ancient brews were “grogs” made by mixing fermentable sugars – malt, grapes, honey, other fruits – so I was still channeling my Bronze Age forebears here, though this could technically qualify as a “braggot” by modern standards.

Straining out the chunky bits.
When all was said and done, with sugars from malt, figs, and honey, the wort at pitching time was 1.078, a fairly big brew. I pitched a 600 mL starter made from Dogfish Head Midas Touch dregs I cultivated from a bottle.

The offering, prepped and ready for sacrifice.
Would the ancient brew gods reward my efforts with the dulcet tones of a gurgling airlock? Find out in my next update.
A Hobbity, Hoppy Midwinter IPA
I’ve written before about keeping it simple in homebrew recipes. Today I’m doing the opposite. I’m sharing a recipe with a lot of bits and pieces, but for a good reason.
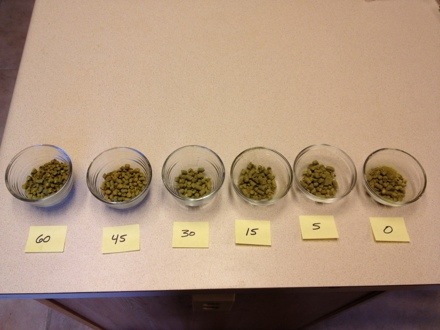
Over the course of 2012, I accumulated several open packages of leftover hop pellets. Hops begin degrading as soon as they are opened and exposed to air, and although this degradation can be slowed by storing them frozen in a Ziploc or vacuum-seal bag, that won’t preserve them indefinitely. It’s recommended to use open hops within about 6 months, after which they start to lose their bittering potential day by day as the alpha acids break down.
Of course, it’s not an all-or-nothing deal: it’s not like they’re perfectly okay to use on day 180 and then bad on day 181. As long as they don’t smell funny – like cheese or feet – hops older than 6 months can be used, but the alpha acid degradation (i.e., decreased bitterness) should be taken into consideration for recipe balance and IBU calculation. Fortunately, many brewing programs – like my favorite, BeerSmith – have tools for calculating the effective alpha acid potency of old hops.
So I spent an evening sampling old hops to see how they were holding up, and was surprised to find that the oldest hops in the freezer weren’t the worst ones. For instance, some Saaz and Citra open since 2011 were perfectly fine, but a packet of Warrior from February 2012 was thoroughly becheesed. I separated the good from the cheesy and used BeerSmith to calculate the adjusted AA of the good hops so I could use as many of them as possible in a winter IPA. In homage to new The Hobbit movie coming out this week, I called it Old Took’s Midwinter IPA after Bilbo Baggins’ maternal grandfather, whose memory inspired Bilbo to embrace his adventurous side.
I brewed it on Black Friday in the company of my visiting male family while the ladies were at the outlet mall, which seemed like a great way to show my British brother-in-law (a pub operator who knows a thing or two about a good pint) how we do IPA here in the States.
The grain bill is below. I mashed at 152°F for an hour:
- 12 lbs 2-row malt
- 1.5 lb Munich malt
- 1 lb Victory malt
- 8 oz Crystal 40L
- 8 oz Crystal 60L
- 8 oz Rice Hulls (for efficiency & sparging)
But who am I kidding? The hops are what we’re really interested in here. First up, the oldies but goodies. I’ve noted both the original AA of all the hops below and the adjusted AA, based on BeerSmith’s calculations:
- 0.25 oz Nugget (12.4% orig AA, 11.4% adj AA) for 60 min
- 0.5 oz Saaz (3% orig AA, 1.84% adj AA) for 60 min
- 0.5 oz Falconer’s Flight (11.4% orig AA, 10.4% adj AA) for 45 min
- 0.5 oz Citra (13.6% orig AA, 11.73% adj AA) for 45 min
That was it for the old hops, and I kept them near the beginning of the boil. The reason being that if there were anything unpleasant about them after all this time, it was better to use them early on for bittering, instead of later in the boil when hops contribute more flavor and aroma. Based on my smell/taste tests, it probably would have been fine, but I didn’t want to take the chance.
I also used some fresh hops, mostly (but not all) after the 45-minute mark:
- 0.5 oz Warrior (16% AA) for 60 min
- 0.25 oz Cascade (6.2% AA) for 30 min
- 0.25 oz Willamette (4% AA) for 30 min
- 0.25 oz Cascade (6.2% AA) for 15 min
- 0.25 oz Willamette (4% AA) for 15 min
- 0.25 oz Cascade (6.2% AA) for 5 min
- 0.25 oz Willamette (4% AA) for 5 min
- 0.25 oz Cascade (6.2% AA) at flameout
- 0.25 oz Willamette (4% AA) at flameout
Measured and organized into each addition, all those hops made a pretty picture on my kitchen island:
My first photograph that’s a true work of art. I call it “Oscar Charlie Delta”.
The OG was 1.070 and I pitched 15.1 grams of rehydrated Safale US-05 yeast. I set the fermentation chamber to an ambient temperature of 63-66°F and it took off like a rocket within about 12 hours. It fermented very actively for about 8 days before settling down, and once I take gravity readings to ensure fermentation is done, I’ll add more Cascade and Willamette dry hops later this week.
If I had any doubts lingering in the back of my mind about using old hops, they were put to rest when I tasted the wort sample I took for my OG reading. It was sweet and biscuity, with a burst of multicolored floral/herbal bitterness, complex and layered as one might expect from so many hops. Tasting how much life was still left in those old hops, I was reminded of the last line spoken by old Bilbo Baggins in Peter Jackson’s film of The Return of the King when, aged and frail but still spirited, he looked out over the sea to the west and said, “I think I’m quite ready for another adventure.”
Vote for Progress … hops
Saturday was Learn to Homebrew Day in the USA, and today is Election Day. To honor both events, I did what any patriotic and pedantic zyme lord would. I made beer.
I called it Colonial Progress Ale, and it’s something between an English bitter and an English brown ale. “Colonial” comes from the fermentables, adapted from a recipe I envisioned for a colonial-style ale during a trip to Philadelphia earlier this year. I ended up with:
- 6.5 lbs American 2-row
- 1 lb Victory malt
- 8 oz Flaked wheat
- 8 oz Flaked oats
- 1 lb Molasses
Each of these ingredients was chosen for a reason, starting with American 2-row malt as the base. Wheat is common in colonial ale recipes, including one attributed to Thomas Jefferson. Victory and oats I had no historic precedent for, but I added them for body in the finished beer, along with some bready/biscuity flavor (Victory) and silky smoothness (oats) to accentuate the English-inspired malt profile. I mashed at 153°F for medium fermentability, counting on the highly fermentable molasses to dry the beer out.
The mash begins.
Ohhh, molasses. A common ingredient in beer in early colonial Philadelphia (according to a quote from William Penn), I can eat the stuff right out of the jar. But I was nervous about using it after reading John Palmer’s tasting notes ranging from “rumlike” and “sweet” (woohoo!) to “harsh” and “bitter” (ergh). But further research online suggested that harsher flavors were associated with fermenting mineral-rich blackstrap molasses, not the regular unsulphured kind. I went with regular, and added them at the beginning of the boil with high hopes.
The “Progress” part came from the hops: one ounce of 6.6% AA Progress at the 60-minute mark for bittering, and another quarter ounce at 15 minutes for flavor. Progress is a UK varietal related to Fuggle hops, a good choice for English-style ales.
But that wasn’t all I added to the boil. Hops were available to some colonial brewers, but apparently not all that prevalent, so other bittering herbs were common. My original plan was to use horehound, but I realized the medicinal flavor might overpower a low-gravity ale. I thought of rosemary, but was talked out of it by the sages (ha, ha) at Austin Homebrew Supply. I landed on:
- .25 oz Juniper berries (crushed in mortar)
- .5 grams Sweet Gale (dried)
I added the herbs in the last minute of the boil and let them steep during cooling and whirlpool. I may add more later during conditioning.
The wort had an OG of 1.046, a true session ale for the upcoming winter (insert witty apropos Valley Forge reference; I can’t think of one). I pitched the slurry from a 2-liter starter of WLP008 East Coast Ale Yeast – reportedly the Sam Adams house strain – in keeping with the colonial theme. I set the fermentation chamber to an ambient 65-68°F, a little warmer than typical to coax some vintage ester flavor from this low-flocculating yeast.

Fermentation underway after 24 hours.
By this time tomorrow, the future of the United States will be written for the next four years. But regardless of whether my guy wins or not, I’ll have something to look forward to: a beverage in the tradition of the first beers brewed on American soil. Beer has always been a part of American culture, even before there was a United States, and from #1 on down to #44 many presidents have been homebrew aficionados: George Washington, Thomas Jefferson and James Madison were homebrewers and Barack Obama bought a homebrew kit for the White House with his own money. And beer remains one of the few things people can agree on regardless of personal politics.
Don’t forget to vote today, no matter who you’re supporting. Red and blue be damned. We can all party together in the colors of the SRM scale.
Getting Medieval with Ginger Mead
Anyone reading this blog regularly will notice that for the past few months I haven’t really been brewing. I’ve been out of the house a lot, so my homebrew stock hasn’t depleted. Brewing would just net me a backlog of new beer waiting to get stale, not to mention the challenges of brewing outdoors in the Texas summer heat. But now that fall is here, I’ve returned to brewing with a ginger mead from a new recipe. Because ginger is a spice, ginger mead qualifies as a metheglin.
The history/fantasy geek in me loves mead, and it’s hard to find in stores. Most commercial examples are too sweet, better suited to mulling and heating; and my desire to make good easy-drinking mead was a big part of my initial interest in homebrewing. And here’s the big secret: it’s really easy. Meadmaking offers some new challenges for a beer brewer, but the brew day itself is fast and straightforward, especially compared to all-grain brewing. My mead brew day takes 2-3 hours; beer brewing takes me 8 hours from setup to cleanup. There’s no missing mash temperatures. No stuck sparges. No boilovers. No boiling at all – the aroma compounds in honey are volatile and boil off quickly, and honey’s natural antimicrobial properties make sanitizing the must (the pre-fermentation mixture of honey and water) unnecessary.
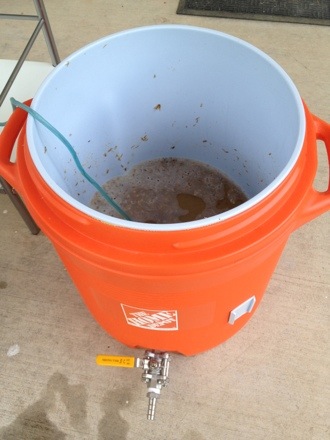
Preparing a 5-gallon mead must is as simple as heating 2-3 gallons of water on the stovetop, just enough to dissolve the honey (around 110°F), and mixing that with top-off water in the fermenter. I used the 7.5-gallon aluminum pot that usually serves as my hot liquor tank:

In tonight’s performance, “Kettle” will be played by “HLT”.
I used bottled spring water – for no other reason except that I wanted to pre-chill the top-off water, and Target had it on sale. I’ve made great mead with filtered tap water in the past. I heated 2.5 gallons to 120°F while Lisa peeled and diced fresh ginger root.

Chopping action shot!
- 10 lbs Kirkland Signature Clover Honey (Costco store brand)
- 4 lbs Round Rock Honey (local premium wildflower honey)

Los Fermentables.

… and a sore right arm.
I racked this to my fermenter and topped it off to 5.25 gallons with refrigerated spring water. The must temperature equalized at about 80°F with an OG of 1.101. I’m targeting 1.005 FG for medium-dry residual sugar and an ABV of roughly 13%.
Meanwhile, I rehydrated 10 grams (2 dry packets) of Lallemand Lalvin K1-V1116 wine yeast in 2/3 cup of cooled boiled water with 12.5 grams Lallemand Go-Ferm rehydration nutrient. Unlike barley malt, honey is very low in nutrients yeast need to thrive, so adding nutrients to the must is … well, a must. I follow the staggered nutrient addition schedule recommended by a user named hightest on the board HomeBrewTalk.com, which calls for 4.5 grams each of diammonium phosphate (DAP) and Lallemand Fermaid-K nutrient at pitching, with additional nutrient additions later during fermentation (there’s tons of great information from this guy here – as invaluable as Ken Schramm’s The Compleat Meadmaker, which I’ve read cover to cover). I mixed the DAP and Fermaid-K into the must with a healthy beating from my drill-mounted aeration whip, pitched the yeast slurry, and shoved it into the fermentation chiller.
All this week, I’ll be aerating the must twice daily with the whip and adding additional yeast nutrients as necessary. Once primary fermentation is complete, I’ll rack to a carboy and age it for at least six months before bottling. I expect to have to add more ginger again for some additional spice after all that aging, which I’ll add directly to the carboy. If it finishes too dry, I’ll stabilize it and add some of the leftover Round Rock Honey.
Meadmaking is extremely rewarding, and a great step outside the box for any brewer. Even extract beer brewers can make mead easily with a minimum of additional equipment, unlike jumping from extract to all-grain beer brewing. And with so few meads available commercially, it’s a great way to share with friends this ancient libation so rich in history, and yet so mysterious to many.
Strike up the Sousa march …
This Fourth of July, I celebrated my right to make beer. Regular readers may recall that a few months ago, I posted a recipe for an American Colonial Ale inspired by a recent trip to Philadelphia. The perfect beer to brew on the Fourth of July! But silly me, I forgot all about it until after I left Austin Homebrew Supply with my ingredients for a different beer. So I’ll have to brew the colonial ale another time. Oops …
Instead, I brewed a single-hop Galena American Pale Ale, the second in my “Misty Mountain Hop” series of single-hop brews (the first was a Citra APA). This was a new grain bill entirely of my own devising, and if the beer comes out well, I’ll probably make it my standard grain bill for all APAs from now on:
- 9 lbs 2-row malt
- 1.5 lbs Munich malt
- 8 oz Crystal 40L
- 8 oz Crystal 75L
The wort looked and smelled delicious coming out of the mash tun, a sort of tangerine-copper color with an aroma like toasted artisan bread. I’ve got high hopes.

Vorlauf action shot!
The hop additions were all Galena, of course. This common bittering hop doesn’t seem to be used often for late hop additions, but I’ve read reviews of a few beers with late Galena hops that had descriptors like “dark fruit” and “tart berry”. Sounds awesome to me. I used:
- .85 oz at 60 minutes
- .5 oz at 15 minutes
- .5 oz at 5 minutes
- .5 oz at flameout
All of my Galena hop pellets were rated 12.8% AA. I’ll probably add another half ounce of dry hops before kegging for added aroma. My OG came in at 1.055, pretty much smack in the middle of the BJCP range for American Pale Ales. I pitched 15 grams of rehydrated Safale US-05 yeast.
But my real declaration of independence this brew session was from my old swamp cooler. After long deliberation (and somehow, writing about the idea a couple of weeks ago made it seem more feasible – thanks, Internet!) I finally bit the bullet and got myself a true temperature-controlled fermentation chamber: a Kenmore 5.1 cubic foot chest freezer with a Johnson Digital Temperature Controller dialed in to a range of 65-68°F.

Crazy. Sexy. Cool.
The Galena APA has been in there for a few days, and I’m still working out the kinks. Last night after I was out of the house all day, it had somehow got down to 60°F, though it was back up within minutes after I cracked the freezer lid for a while. But I can already say that this is one of the best purchases I have made in support of my homebrew habit. Ever. No more checking the closet every hour to monitor the temperature. No more keeping dozens of frozen water bottles on hand, waiting to be used in the swamp cooler, spending their idle time rolling around my garage freezer and making it harder to find more important stuff (like, you know, food). Perhaps most importantly, no more risks of infection from the stagnant water in the swamp cooler, which always bothered me. I just let it do its thing, check it once or twice a day, and it’s always been in the range I want … except for last night, but it’s never gotten higher than 68°F.
And now I am at liberty to brew what I want to brew, any time of year. I can lager in August. With a few modifications, I can make warm-fermented fruity Belgians in February.
Freedom. I dig it. Don’t we all?
Back to Basics with Bavarian Hefeweizen
As homebrewers, we often have a tendency to throw a bunch of different ingredients into recipes just because we can. Sometimes economy’s the reason, like using 5 grams of 8 different bittering hops because they’re in the freezer and about to expire. Other times, it’s just plain stubbornness, like the tendency of American homebrewers (myself included) to put crystal malt in everything. But it’s good to be reminded that sometimes, simplicity is best. After all, humans have been brewing for thousands of years, and the ancient Sumerians certainly didn’t have eight different kinds of debittered black malts to choose from.
My lesson in simplicity this week is a Bavarian Hefeweizen I brewed Sunday. I called it Weiss Blau Weiss. The name means “white-blue” and is an homage to the flag of Bavaria, a pattern of white and blue diamonds (called “lozenges” or sometimes “fusils” – your heraldry lesson for the day) seen at German-themed beer events all over the world.

You remember this, don’t you? You puked on it last Oktoberfest.
I brew mostly wheat beers in the summer, because they ferment better in the warm temperatures we face in Texas in the hottest part of the year. But most of my wheat homebrews in the past have been American-style wheats, fermented with White Labs WLP320 American Hefeweizen Ale Yeast. It’s a great clean-fermenting yeast, and I recommend it for any wheat ale with fruit, herbs or spices. But I’m bored with that clean flavor lately, and I’ve been enjoying commercial wheats with the kind of clove/banana esters that come from German hefeweizen yeast strains. So after a lot of deliberation (and with input from my soulmate and recipe consultant Lisa, who talked me down off the ledge of including some exotic spice such as mahlab in the boil) I decided to keep it simple with a traditional Bavarian hefeweizen – simple grain bill and simple hops, allowing the ester character of a German yeast strain to come through.
The grain bill was a 50/50 split of base malts – no specialty grains, no aromatics, no crystal. Just:
- 5.5 lbs German Pilsen malt
- 5.5 lbs White Wheat malt
I mashed at 152°F for an hour.
Noble hops are standard for this style, so I used:
- 0.5 oz Hallertauer (4.8% AA) for 60 min
- 0.5 oz Hallertauer Saphir (4.2% AA) for 60 min
- 0.1 oz Hallertauer (4.8% AA) for 15 min
- 0.1 oz Hallertauer Saphir (4.2% AA) for 15 min
Using two different Hallertauer varieties may seem unnecessarily complex in this so-called “simple” beer. But I really dig Saphir, and I had 0.6 oz in my freezer, which wasn’t enough. So I supplemented the Saphir with ordinary Hallertauer to get an ounce for bittering and a little extra for flavor, while using up my Saphir backstock (see? economy). In the end, I liked the symmetry of splitting the hop additions 50/50, same as the grain, so I ran with it.
The OG of the wort was 1.052. I pitched a smack pack of Wyeast 3068 Weihenstephan Weizen with no starter, hoping the low pitching rate will promote ester production. I’m also keeping the fermentation temperature between 68-72°F for the same reason. The word hefe in hefeweizen is German for “yeast”, and I want the yeast esters to take center stage.
On Monday, the beer was fermenting so vigorously I had to replace my airlock with a blowoff hose – always a proud moment for any brewer. Today, it’s still bubbling several times a minute. Assuming it’s done fermenting by this time next week, I plan to keg it immediately. Hefeweizens are great consumed fresh, and while I don’t think a longer conditioning period would hurt it, I don’t see it helping much … plus, I have an empty tap on the kegerator ready for a new beer!
It was hard, but I think keeping it simple will serve this beer well. While I love creativity in brewing, and there’s a strong desire to be original by throwing the kitchen sink into every recipe, sometimes one needs to dial it back and focus on the basics, the minimum needed to make a good beer in a classic style. And as with so many other things, part of being a good brewer is knowing what not to do, as much as knowing what to do.
A Crescent City Concoction, part 2
On Monday I finally kegged my Crescent Moon Café au Lait Stout after 4 weeks in the fermenter. I also finally added the eponymous coffee to the beer, crossing the line from a plain old milk stout (albeit one made by my own from-scratch recipe) into something truly unique.
The coffee and chicory was cold brewed on Lisa’s Toddy system: combining a pound of ground coffee with 9 cups of cold water, and letting it steep overnight, we brewed about 40 oz of concentrated coffee extract. Theoretically, this coffee extract is stronger than regular brewed coffee, but when we mixed a little bit of the extract with a sample of the beer at the planned ratio of 16-24 oz of coffee and chicory per 5 gallons of milk stout, there just wasn’t nearly enough coffee flavor. So we ramped it up, added more and more coffee until we got to a point where we were happy. The ratio we landed on was 64(!) oz of extract in the 5 gallon batch of beer. That’s a lot more than any coffee/beer recipe I’ve ever seen, but I let my tastebuds do the deciding. And I did want a bold coffee flavor.
The extract was added directly to the keg, and the beer was racked on top of that. This displaced a half gallon of the beer, so we ended up with .5 gallons of coffee extract to 4.5 gallons of beer, or a ratio of 1 part coffee to 9 parts stout. What I sampled really did taste like café au lait, so I’m pleased. Now it’s carbonating in the kegerator, and will be ready to drink in a few days.
This beer has made me feel like being a newbie homebrewer all over again: The anxious counting of day after day while I wait for the beer to be ready. The adventurous experimentation. The excitement over the unknown. If these phrases sound like ways to describe a brand new romance, it’s no accident. I’m in love with homebrewing, and this stout has reminded me why I fell in love with it in the first place. I want more of this thrill.
With June nearly upon us, I’ll look to a wheat beer for my next brew, as they’re much more forgiving to make in the heat of a Central Texas summer, even in my air-conditioned home. I’ve talked about a blood orange or other citrus wheat for a while now. I could resurrect one of my wheats from previous summers – lemongrass, ginger, or agave – but the wanderlust of experimentation is consuming me, and I think I’m itching for something new.
Read my original post about the recipe and brew day for the café au lait stout here.
A Crescent City Concoction
For a long time now I’ve been in love with milk stouts, and have wanted to brew one. Lisa has also been asking for a coffee stout, specifically one using New Orleans-style coffee and chicory (we’re both New Orleanians by birth), to slake her thirst for java. In a flash of inspiration, I decided to combine the coffee/chicory stout and milk stout into one brew: a “café au lait” stout. You know, just like Café du Monde on Decatur Street would serve if they had a liquor license.
A sweet stout is a great beer style to honor my hometown. Like New Orleans, sweet stout is dark and mysterious, but full of character. It may be intimidating to the uninitiated, even harsh at first; but it’s warm and inviting when you know what to expect. And you discover something new about it with each new taste. That’s all very poetic, I know, but it’s a lot to explain when filling a glass. So adding the ingredients of a real French Market café au lait was exactly what I needed to bring my lofty symbolic interpretation of the city back down to earth.
I named the brew Crescent Moon Café au Lait Stout in honor of New Orleans’ nickname “the Crescent City” and a current obsession I have with all things lunar. I’d like to give a quick toast here to the HomeBrewTalk.com community, and the great people at Austin Homebrew Supply, for helping me finalize the recipe. The grain bill:
- 9 lbs 2-row malt
- 1.5 lb Coffee Malt
- .75 lb Roasted Barley
- .5 lb Crystal 90L
I chose specialty grains with coffee-like flavor profiles to accentuate the coffee in the finished product. I’d never used coffee malt (which despite the name is just barley malt – it has no actual coffee in it) before, but it was advertised as being kilned to 130-170L with a smell and taste like coffee, and it didn’t disappoint. Roasted barley, too, is known for its coffee characteristics, so I opted for it instead of black patent malt to get a little more flavor. The medium-dark crystal malt was added to round out the malt profile of the beer and leave some respectable body.
I started the mash at 153°F, and it dropped to 152°F by the end of the 60-minute mash.

Gore from severed starch molecules splatters the walls of my mash tun like a scene from Dexter.
I did two batch sparges and ran 7.75 gallons of 1.032 wort into the kettle. For my last several brews, I have been forced to run off extra wort and boil it down for 90 minutes to hit my target OG. Someday I’ll figure out why that’s the case, but for now I don’t mind the longer boils. It gives me time to catch up on reading and Words With Friends.
I took a sort of bare-minimum approach to the hops, as I really wasn’t interested in a lot of hop character. I want the aroma and bitterness of the coffee and chicory to come through. So I added just .75 oz of 12.4% AA Nugget hop pellets to the boil with 60 minutes left to go, and no late hop additions. I added 1 lb of lactose (the ingredient that makes a milk stout a milk stout) later in the boil, with 20 minutes left.

It's not just pretty to look at. The backyard smelled like a Starbucks.
Notice that I haven’t actually added the coffee and chicory yet. So far, this café au lait stout is just a milk stout begging for a wake-up, but it’s amazing how much it already smells like coffee, thanks to the malts I used. At kegging time, we’ll cold brew between 16-24 oz of coffee and chicory and rack the beer onto that. Cold brewed coffee is recommended because of its smoothness, and it’s really the only way we drink coffee and chicory in this house anyway.
The OG of the wort was 1.064, and I pitched 14 grams of rehydrated Fermentis Safale S-04 yeast. After years of using liquid yeast and rarely using the same strain twice, I’ve recently started using more dry yeast, and this simple English ale strain is rapidly becoming my go-to strain. That’s partly because I’ve been making a lot of British styles, and partly because my busy schedule hasn’t left me with much time to properly prepare liquid yeast for pitching (making a starter, etc.). But I couldn’t have settled down with a finer microbe, because S-04 works fast and flocculates like a rock star, leaving some fruity esters behind but mostly a very clean beer. I brewed this beer on Saturday, and as of yesterday, the kraeusen was already starting to fall.

Moments after pitching the yeast. They may be stooges, but they keep my fermentations cool.
I’m really excited about this brew. So much so that I couldn’t wait to make it, even though my timing means that I’m going to have a thick, malty stout on tap during the brutal Texas summer. But a friend said to me recently, “Any season is the right season for stout,” and I couldn’t agree more. Especially when my respite from the heat will be a tall, delicious pint of the Big Easy.
So, who’s bringing the beignets?
Philadelphia, and Thoughts on Colonial Brewing
My “day job” (i.e., the one that pays me) sent me to Philadelphia this week. Today I was lucky enough to get a chance to venture out of the cozy suburb where my employer has its offices and into the exciting bustle of one of the oldest cities on the continent. I saw the Liberty Bell and Independence Hall, had a cheesesteak that blew my damn mind, and drove in a circle past the Philadelphia Museum of Art (the famous steps from Rocky).
Philadelphia has had a profound effect on me. The city appears to have been designed with the intent of sending a message to visitors: “Hey, you know that place between Canada and Mexico that the entire world has been watching for centuries? The one with the Bill of Rights and the guns and the Coca-Cola? Yeah, the United States of America. We invented that place, bro.” Everything here is named after George Washington or Benjamin Franklin. The city logo is a bell with a crack in it. The shadiest-looking strip malls have words like independence and liberty in their names. And though it may not be the first thought on the mind of every modern Philadelphian, there is a feeling in the ground itself here that the spot you’re standing on is one where something important happened.
Now I’m back at my hotel, packed and ready to board a plane to return to Austin tomorrow. And because sitting alone in a hotel room drinking Yeungling Lager and listening to the Stone Roses would just be too pathetic, I’ve been inspired by my wanderings today to read about colonial brewing. And thinking it’s high time I do something of the sort.
Summer is around the corner, and a low-alcohol historic colonial brew may be just the thing for backyard refreshment in the Texas heat. And since come May it will be very hard to keep fermentation temperatures down in the swamp cooler in the Harry Potter closet, I can rationalize any esters in the brew as part of the “colonial charm”.
The gravity and bitterness should be similar to that of an English bitter, around 1.040 and 16 IBU. But I’ll get there with 6.5 lbs of American 2-row malt mashed at around 153-154°F. In the boil:
- 1 lb Molasses
- 0.5 oz Northern Brewer (~9% AA) for 60 minutes
- 1 oz Horehound for 5 minutes
I could replace the Northern Brewer with East Kent Goldings, an older and certainly more “English” hop, but that would push the recipe closer to an English bitter than I’d like. Ultimately, I don’t think it matters much because the hops are just for bittering. The flavor and aroma will come from the horehound, which I’m using as a thujone-free substitute for wormwood (an attested colonial ale ingredient). For yeast, White Labs WLP 008 East Coast Ale Yeast is the obvious choice.
Earlier this evening, I read a quote from William Penn himself: “Our Beer was mostly made of Molasses which well boyld, until it makes a very tolerable drink, but note they make Mault, and Mault Drink begins to be common, especially in the Ordinaries and the Houses of the more substantial People.” One can imagine the pride Penn must have felt at explaining to his reader how his city, once a town of molasses-quaffing hooligans, was changing into a place where “substantial” people were starting to prosper enough that they could afford to drink real malt beer. I like to think my brew will be one that Penn would be proud of, and a fitting tribute to how far his city (and the nation conceived here) have come since he landed on the bank of the Delaware in 1682: familiar but changed, refined but true to the spirit of improvisation out of necessity.
The plan is to make this my first brew for May, after this weekend’s New Orleans-inspired café au lait stout (details Saturday!). And if I find myself inspired by any other great American cities, who knows what will be next?
For more on Philadelphia brewing throughout history (including the colonial period) see this article by Rich Wagner from the Spring 1991 issue of Zymurgy.
