A monster saison
A new Godzilla movie comes out today! I’m a fan of the kaiju classics, so I’ve got my ticket for tonight. Babysitting realities prevented me from going to any of the advance screenings this week, but no matter – I’ve been prepping for tonight by watching Showa-era Toho kaiju movies for weeks with my thirteen-month-old. He’s enjoying them so much that he now smiles every time he sees the Toho Company logo, laughs when he hears an Akira Ifukube score, and kicks happily when he sees Godzilla’s head (sure signs that I’m doing something right as a dad).
Last night while watching Ghidorah, the Three-Headed Monster, I also tapped the first glass of my new dry-hopped saison Le Petit Kaiju. This was an update of last year’s Le Petit Plésiosaure, a Summit-hopped pseudo-clone of Brooklyn Sorachi Ace I brewed and bottled to give as favors at my wife’s baby shower. Why kaiju this time? Not just because of Godzilla’s return to the big screen. See, we’ve been calling our little one “kaiju” for as long as I can remember. And replacing the peaceful, cuddly Loch Ness Monster I featured on the Plésiosaure label with the shrieking, atomic-breathed, stomping lord of destruction Godzilla seemed very fitting now that he’s a toddler.
The grain bill for the saison was the same as last time. I mashed in with 11.75 lbs (5.33 kg) of Belgian pilsner malt for a single rest at 148°F (64°C) for 90 minutes, which is recommended at lower temperatures to ensure full conversion of the starches. I added a pound of dextrose at the beginning of the boil to bring the OG up to 1.067. And lest you turn your nose up at the dextrose, let me say that I believe kettle sugar does wonderful things to the right beer recipe (i.e., dry), and I follow the teachings of Randy Mosher, who said in his book Radical Brewing that Belgian candi sugar – which many would use in a similar recipe – is “a complete rip-off”. Dextrose or evaporated cane sugar for light beers, or a little piloncillo or demerara for darker beers, have never done me wrong if I keep those simple sugars to less than 25% of the fermentables.
I duplicated the Summit bittering hops of Plésiosaure with .4 oz (11.3 g) of 16% AA pellets at 60 minutes, but changed up the later hop additions to pay homage to Gojira’s Japanese island roots. While Sorachi Ace – a Japanese cultivar – would have been perfect, I’m still having trouble sourcing them. I did, however, manage to get my hands on some 15% AA Pacific Jade from New Zealand. It’s still Eastern hemisphere and Pacific rim, and has a profile reminiscent of Sorachi Ace, if not quite as sublime. I added 0.4 oz (7 g) at 30 minutes and 3 oz (85 g) at flameout.
I pitched a starter of White Labs WLP565 and fermented for 3 weeks before dry hopping with my last ounce (28 g) of the Pacific Jade hops, which sat in the fermenter for 2 more weeks. The FG was 1.005, leaving this kaiju saison a monster at 8.2% ABV, even stronger than last year’s batch.
Surprisingly, Le Petit Kaiju is very easy drinking, as I found out last night. It poured a lovely golden straw color. A little cloudier and thicker than I expected, but this was the first glass off the keg so there was a lot of sediment in suspension.

Skreeeoonnnkk! (the correct way to spell Godzilla’s roar)
The head dissipated very quickly, so more time on the CO2 will do it good. But the aroma is sweet and citrusy, almost like lemonade, with a lot of yeasty character. As for the flavor, it’s spicy and lemony, bold and memorable. But it’s not quite dry enough. At first I was shocked by the heavy mouthfeel given the low FG, but then I remembered all the yeast in suspension. I’m hoping once the dregs are drawn off and I get some clear beer out of this keg, it will have the dry character I’m looking for. I’ve got a lot more Toho movies to show my little kaiju this summer, and I’m going to need lots of refreshment.
SMaSHy thing
HULK SMASH!! – orig. attrib. to Dr. Robert “Bruce” Banner, shouted by little boys everywhere
I recently took a break from my own frantic child-raising adventure to help my wife host a baby shower for friends expecting their first baby in October. The main request we got from the expecting parents was to make the event couples-friendly and laid back, with food, beverages and fun for the ladies and guys alike.
So in true Zyme Lord fashion, I decided to brew a beer.
I love having guests over to try my homebrew. It’s a great way to get objective feedback and improve my beer. This was a unique opportunity to reach beyond my closest friends – all of whom are already familiar with my homebrew – and get feedback from lots of people I didn’t know as well … most of whom I’ve worked with and gotten to know at other get-togethers, but who I hadn’t yet had a chance to have a beer with, let alone one of my own.
My kegerator was stocked with three kegs, but I wanted the special release beer to be the go-to tap. So it had to be something everyone could enjoy, regardless of their level of beer geekdom or personal style leanings. It should be in a popular and accessible style, and of course low-alcohol enough to keep the party family-friendly (it was, after all, a baby shower). I just didn’t know what.
Then one day when I was at the house of my expecting friends, flipping through the dad-to-be’s staggering collection of Hulk comics, the answer punched me in the face like a big green fist: I’d brew a SMaSH (Single Malt and Single Hop) beer in honor of one of my friend’s favorite comic characters.
I’ve made beers from a single malt and single hop before, but this was my first recipe following the SMaSH ethos: a platform to showcase the unique flavor and aroma of a single base malt and single hop (ideally added throughout the boil to reveal its bittering, flavor, and aroma characteristics). I designed my SMaSH as a pale ale, fermented with a clean, neutral yeast: full of flavor but easy drinking, interesting but not intimidating.
Also in true Zyme Lord fashion, I chose ingredients for symbolism as well as flavor. The grain bill was 10.5 lbs of Maris Otter malt mashed at 154°F for 60 minutes. I thought the nutty flavor of Maris Otter would be great unadulterated, and it was also a fun choice to commemorate the English ancestry of the growing family who were our guests of honor.
I also wanted to incorporate ingredients from Oregon and Maine, the two states where my friends have their roots. Oregon was easy. I used Willamette hops (4% AA), adding them as follows for just under 40 IBU:
- 2 oz at 60 minutes
- 1.25 oz at 15 minutes
- 1 oz at flameout
Finding an ingredient to represent Maine was tricky. I located a few boutique maltsters up there, but even if I could get them to sell me a single sack of grain at an acceptable price, I doubted I’d get it shipped in time. So I ended up breaking the SMaSH rules and adding a small amount of adjunct: 8 ounces by weight of Maine maple syrup, at the start of the boil. This was a minuscule addition in a 5-gallon batch; enough to add 2 tiny gravity points but no flavor. I added it for no reason really other than to say it was there – a technique I refer to affectionately as “KISS blood”. A little cheating was worth it to tell the story.
The OG was 1.058 and I pitched a single pack of Safale US-05 dry. Fermentation took off quickly thanks to a little yeast nutrient in the boil. After 15 days, it finished out at 1.010 for 6.3% ABV: not quite as sessionable as I was shooting for; but what the hell, the party was only three hours. I dry hopped with 0.75 oz of 4% Willamette for nine days.
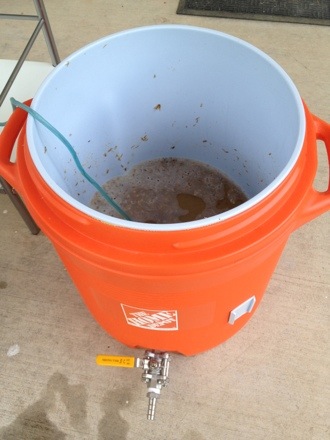
We served the beer frat-house style, with the keg in a bucket of ice. No pumps or picnic taps, though – this was the maiden voyage of my new portable paintball tank CO2 rig and post-mounted faucet from KegConnection.com.

Chilling in the chest freezer, before we moved it to the bucket.
As it turned out, the visual of a battered old Cornelius keg sitting in a bucket of ice with a hose hanging off one side and a tap handle mounted to the other was an excellent conversation starter. I spent a lot of the party talking about homebrewing and getting to know some friends better. As for the beer, it was smooth, just hoppy enough, and very refreshing. We went through 4 out of 5 gallons before the party was over, and some guests were inspired to try a flight of all four brews I had on tap in the house. A smashing success, I’d say.
See what I did there?
An homage to UK pubs (and a classic monster movie)
I vote we go back to the Slaughtered Lamb. – Jack Goodman, An American Werewolf in London
Homebrew inspiration can come from strange places. My favorite homebrews are the ones that were inspired not just by an imagined set of flavors, but by places I’ve visited, stories I’ve read, movies I’ve watched, etc. I love using the language of malt, hops, and yeast to tell a story about something more than beer. The trick, though, is that brewing is not an abstract art. A good concept might make for a great conversation starter, but no matter how high-concept a brew is, if it doesn’t taste good I don’t want to be stuck with five gallons of it (I graduated from a Catholic university in New Orleans, but that doesn’t make it a good idea to brew a crawfish & Bananas Foster porter with Trappist ale yeast for the alumni picnic). Finding the right balance between concept and taste is the ultimate goal.
In spring 2011, Lisa and I visited the United Kingdom for three weeks and spent a lot of time in pubs. We drank real ales from so many regional breweries whose names I can’t remember (except for Brains – #1 among zombies in South Wales) served at cellar temperature, often from beer engines – though at one awesome hole-in-the-wall in a one-road hamlet in Scotland I think I remember drinking beer dispensed from a cardboard box. The taste and aroma of real British ale, even the sight of the interior of a British pub, are vivid and powerful memories for me.
In summer 2012, I saw John Landis’ 1981 film An American Werewolf in London for the first time and my nostalgia was kindled by an early scene in the film at a fictitious Yorkshire pub called the “Slaughtered Lamb”. So I brewed a special bitter with English malts and American hops that I named Kessler’s Rampage Special Bitter in homage to the film’s main character and titular werewolf. Not long after I kegged it my sister-in-law and her husband, a native Sussaxon*, came to visit for a week and emptied the keg while I wasn’t looking. I took that as a compliment, and decided to brew it again this summer.
The 2013 version was 94% (8 lbs) Fawcett’s Optic malt, reportedly the base used by Fuller’s and other UK breweries. 4 oz each of Crystal 40 and Crystal 150 rounded out the grain bill. Last year I used Crystal 120 instead of Crystal 150, but otherwise the malt profile was the same in both versions and pretty typical of the style. The mash was one hour at 155°F.
The hops were my chance to freestyle. American homebrewers can be pretty predictable in their hop selections for English pale ales – occasionally someone might get bold and use a little Fuggles, but generally it’s either East Kent Goldings, East Kent Goldings, or another … what’s it called? oh yeah, East Kent Goldings. I suppose that’s what judges look for in competition, but the lack of originality disappoints me. American pale ales and English pale ales are cousin styles, and I see no reason why American hops can’t play a role in a damn fine English bitter if the right ones are chosen – i.e., probably not the 4 C’s (though I suspect someone has done it well).
In 2012, I used exclusively American hops in keeping with the inspiration (you can see both recipes here). For 2013, I deviated with one English hop in the mix:
- 0.5 oz Warrior (15% AA) at 60 minutes
- 0.5 oz Progress (6.6% AA) at 15 minutes
- 0.4 oz Willamette (4% AA) at 5 minutes
Although Progress is English and Willamette is American, both are Fuggle derivatives, so I thought they would pair nicely together despite being a slight variation on the original inspiration. Consider it an homage to Jenny Agutter’s character Alex in the film, the English love interest of the American David Kessler (yes, I can rationalize anything with my artsy symbolic bullshit).
I pitched Safale S-04 into the wort with an OG of 1.046. True to the old adage that “English yeast do it faster,” the fermentation bottomed out at 1.010 less than 48 hours later, leaving me with an ABV of 4.7%, palpable but still sessionable. I kegged it after 4 weeks, and after 2 weeks under refrigeration it’s just starting to get good enough to drink.
I don’t have any of last year’s batch left over to do a true vertical tasting, but I’m a little disappointed in this year’s model. I’m not sure the Progress hops were a good addition (sorry, Jenny). I’ve used them in more robust English-style beers like porters and stouts to great effect, but with so little malt character to hide behind, I’m getting a strong tropical fruit flavor though it is mellowing with time in the keg. The other fault is less diacetyl than I like in this style, though it may be hiding under all those Progress hops and may become more obvious as the hop flavor mellows.
So the beer’s not perfect. But considering I half expected the skies to open up, swarms of locusts and some ancient BJCP curse to fall upon me when I put hops other than East Kent Goldings in a special bitter, I think I’m still coming out ahead. I don’t get the feeling of being an American lost in Britain in this version, but my second Transatlantic ale experiment is good enough to brew again. And again. Until I get it right.
*Sussaxon: a native of East or West Sussex. My brother-in-law assures me this although this term is technically accurate, no one uses it. We both like it because it makes us think of the people of Sussex as mud-splattered, armor-clad Saxons performing great acts of manly savagery like raiding cottages across the southern coast of Great Britain. They’re not.
Old Froglegs, or: How I learned to stop worrying and love brewing barleywine
Daddy loves Froggy. Froggy love Daddy? Ribbit. – Hedy Lamarr (that’s Hedley!), Blazing Saddles
Big beers seem to be the norm for some homebrewers. The word “imperial” is thrown around at homebrew club meetings more than at Star Wars conventions, and barleywines seem far more prevalent at the homebrew level than commercially. I suspect many people become homebrewers just to hoard gallons of nose-hair singeing strong ales for a fraction of the cost of buying it commercially. Not me. I mostly drink beers around 8% ABV or lower, and my brewing habits reflect that.
Like many homebrewers, my mash efficiency suffers with bigger grain bills. I get great efficiency with beers around the 1.050 mark, but with beers around 1.070 it’s decent (not astounding). Satisfied with brewing beers mostly in the 1.050-1.080 range, I’ve haven’t bothered to rock the boat by trying a bigger brew. Over time, the idea of brewing a really big beer like an American barleywine became a little intimidating. Imagine a whole category of the BJCP Style Guidelines staring back at you when you close your eyes, whispering, “You’re not man enough to brew me, and you know it.”
Oh, but there’s nothing like having a baby to change your perspective. Faced with responsibility for an adorable but needy new organism while surviving on Clif bars and fifteen hours of sleep a week, the most intimidating non-baby-related activity in the world sounds like a vacation. That first month, I probably could’ve been talked into skydiving. So when someone suggested I brew a barleywine to commemorate Lucian’s birth, my enthusiastic response of “WHY THE HELL NOT!?” was, I’m sure, loud enough to be heard across the Texas Hill Country. I decided to make it the first beer I brewed after he was born.
I started with a name: Old Froglegs American Barleywine, after a nickname we gave Lucian within hours of being born (his legs were constantly crossed as a newborn). The recipe was big but simple, in keeping with my recent emphasis on fewer carefully chosen ingredients. 19 pounds of Maris Otter formed the base: a premium malt more expensive than plain American 2-row, and on a grain bill this big cost adds up. But Maris Otter has great flavor, and besides, how many “first beer after my baby was born”s do you get? I added 3 pounds of light Munich for melanoidins and a half-pound each of Crystal 60 and Crystal 150 for caramel and dark fruit notes. If you’re counting, that’s 23 pounds of grain (plus rice hulls) that would go into my 10-gallon cooler mash tun.
Expecting that high a ratio of grain weight to mash tun volume to seriously impact my efficiency, I took a few measures to compensate:
- Milled my own grain
- Increased sparge water/runoff and extended the boil
- Included kettle sugars for extra fermentables
By milling my own grain I hoped to achieve a finer crush than what I’d get at the homebrew store – admittedly a crap shoot, not knowing how their mills are set. I didn’t actually buy my new Barley Crusher MaltMill for this brew, but it happened to be its maiden voyage. Earlier this year I realized that brewing with a newborn around would require flexibility, since daddy tasks might pop up unexpectedly on the weekend (I was right). With a malt mill in my arsenal, I can buy unmilled grain and crush it on brew day, ensuring fresh malt even if brew day is postponed by a week or more.

Pictured above: the quantity of grain known to maltsters as a metric assload.
I doughed in at a stiff 1 qt/lb and added the rest of the liquor (to 1.25 qt/lb) only after I was sure that my mash tun would fit it all. It did, barely. I sparged to collect just shy of ten gallons of wort, which didn’t fit in the brew kettle, so I saved the extra in a pitcher and added it to the kettle as it boiled down. I didn’t actually start the boil timer until all the wort had been added and boiled down to my usual starting volume. All in all, the boil lasted about 150 minutes.

On the edge of boiling over. He’s a madman! A maaadmaaan!
Once boiling was underway I added a pound – 2 pressed cones – of piloncillo (a.k.a. panela), an unrefined cane sugar particular to Latin American cuisine. I’d had it in the pantry for some time and it seemed a great addition to a barleywine, with its rich molasses flavor and high fermentability leaving the beer high in alcohol and low on cloying sweetness. Protip: smashing the cones with a meat tenderizer before adding them is great stress relief.
I added only 60-minute hop additions to the boil for bitterness. I had 1.75 ounces of Warrior and 1 ounce of Galena in the freezer, so I used them. I also added yeast nutrient to the boil because of the high gravity and 4% adjunct sugars.
I met my gravity target and then some, achieving an OG of 1.114. I pitched 2.5 packets of Safale US-05 dry (I ran out of time to rehydrate) and it took off like a rocket, with bubbles coming through the airlock less than 16 hours later. Two weeks later, the beer was at 1.023, which appears to be its final gravity. I racked it to a carboy at the end of May.
It’s going to stay there for months. I plan to bottle it in November so it’s ready to drink on Lucian’s first Christmas. Since I’m not an everyday barleywine kind of guy, I’ll save it for special occasions, birthdays and other milestones. I think I can get several years of good aging out of it if I treat it right. Even if it starts to decline after a while, I have to save at least one bottle to share with Lucian on his 21st birthday.
And then I can embarrass the hell out of him with the Froglegs thing.
Une saison à la maison
Saison.
In French, the word means season, as in the seasons of the year. Spring, summer, autumn, or winter. A generic term, a category with specimens so varied that each is the opposite of another.
Perhaps it’s no coincidence that the beer style we call “saison” is a varied, open-ended style as well. Call it a seasonal beer unattached to a particular season.
Okay, that’s not entirely true. Look it up anywhere from Wikipedia to the BJCP Style Guidelines, and you’ll learn that saison has its roots in the farmhouses of the French-speaking Walloons of Belgium who spent the winter brewing spicy, refreshing ales to be consumed in the summer by workers pulling long shifts in the fields. So traditionally it’s a summer beer.
But the Wallonian brewing tradition was highly improvisational and localized. Each farmhouse brewed their own beer with the ingredients available at the time, often raised on their own farms. The resulting beers were, unsurprisingly, vastly different from place to place and from month to month.
So unlike the seasonal beers of, say, Germany – which tend toward profile standards of characteristic Teutonic rigidity, with names easy to mark on your calendar like Märzen, Maibock, and Oktoberfest – this traditional Belgian seasonal can be light or dark, strong or sessiony, and anything in between. A December 2006 Style Profile article from Brew Your Own magazine lists a wide disparity of characteristics for the modern style in regards to color, mouthfeel, residual sweetness, strength, hop profile, and spices. The main common thread is the yeast, descended from traditional Belgian strains that produce a characteristic spiciness, an estery je ne sais quoi that makes these beers decidedly farmhousey, even when made in the (sub)urban backyard.
With that range of profiles, I’d say seasonality goes out the window. A strong, dark, spicy saison would be a great nightcap on a cold winter night. I like light, refreshing saisons in spring (I’m pretty sure spring in Texas feels like summer in Belgium anyway). So I brewed one now to be ready by the last week of March.
There was another reason for my timing besides the oncoming vernal equinox. The last beer my wife and I drank together was a bomber of Brooklyn Sorachi Ace, the day before we learned she was pregnant. Our baby is due in April, so what better beer to have on hand to celebrate her return to the world of the ethanol-metabolizing than a hop-forward saison?
I started my brew with a clone recipe of Brooklyn Sorachi Ace from the December 2011 issue of Brew Your Own and a Gallic sense of laissez-faire. The recipe called for 11 lbs (5 kg) of Belgian Pilsner malt, which I increased to 11.75 lbs (5.33 kg) to compensate for lower efficiency on my system (more on that below). This made up the bulk of the fermentables along with 1 lb (453 g) of dextrose in the boil. The recipe also used a 3-step mash, which I did not. I did a single infusion mash at 146°F (63°C). The low mash temperature makes a more fermentable wort, but saccharification takes a little longer so I mashed for 90 minutes instead of my usual 60.
Brooklyn Sorachi Ace is hopped entirely with Sorachi Ace hops, which I couldn’t get locally. Instead of replacing it with a similar substitute, I took a different path entirely. I used 16% AA Warrior hops for neutral bittering, two additions of .37 oz (10.5 g) each at 60 and 30 minutes (~6 AAU in each addition). At flameout, I added 3 oz (85 g) of 15% AA Summit.
I had prepared a 2-liter starter of White Labs WLP 560, an Austin Homebrew Supply-exclusive Classic Saison Yeast Blend. That starter was decanted and pitched into a wort with an OG of 1.073, eleven points higher than my target OG of 1.062. Eleven points!

Not your grand-père’s farmhouse brewery.
Little mishaps are common in brewing, and usually a good sign. Minor, easily correctable problems during the brew day keep the brewer on his/her toes, and (I think) make us less prone to serious mistakes that can’t be fixed. But overshooting target gravity by this much is a new kind of problem for me.
Is it even a problem? Obviously my efficiency is much higher than I thought – I’m noting the data for future batches – and the extra malt I added was unnecessary: a “problem” many brewers would love to have. I’m not entering any contests, so the fact that my OG landed past the upper limit of the BJCP range for saison doesn’t concern me. If it fails to attenuate completely, I may end up with a beer that’s too sweet. But if I got the kind of fermentability I was shooting for out of my low mash, that extra sugar should ferment out, leaving me with an ABV higher than I intended.
So if I’m lucky, I’ll be welcoming the spring with a dry, high-alcohol saison. Maybe it won’t be strong enough to qualify as an “imperial saison”, but it should be worthy of some noble title. I’d settle for “ducal saison” or better yet, “marchional saison”. With its extra kick, it might be a little too intense for farm work, but it sounds about right for celebrating the birth of a new Marchese.
A Hobbity, Hoppy Midwinter IPA
I’ve written before about keeping it simple in homebrew recipes. Today I’m doing the opposite. I’m sharing a recipe with a lot of bits and pieces, but for a good reason.
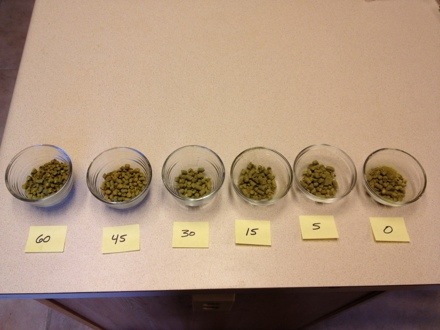
Over the course of 2012, I accumulated several open packages of leftover hop pellets. Hops begin degrading as soon as they are opened and exposed to air, and although this degradation can be slowed by storing them frozen in a Ziploc or vacuum-seal bag, that won’t preserve them indefinitely. It’s recommended to use open hops within about 6 months, after which they start to lose their bittering potential day by day as the alpha acids break down.
Of course, it’s not an all-or-nothing deal: it’s not like they’re perfectly okay to use on day 180 and then bad on day 181. As long as they don’t smell funny – like cheese or feet – hops older than 6 months can be used, but the alpha acid degradation (i.e., decreased bitterness) should be taken into consideration for recipe balance and IBU calculation. Fortunately, many brewing programs – like my favorite, BeerSmith – have tools for calculating the effective alpha acid potency of old hops.
So I spent an evening sampling old hops to see how they were holding up, and was surprised to find that the oldest hops in the freezer weren’t the worst ones. For instance, some Saaz and Citra open since 2011 were perfectly fine, but a packet of Warrior from February 2012 was thoroughly becheesed. I separated the good from the cheesy and used BeerSmith to calculate the adjusted AA of the good hops so I could use as many of them as possible in a winter IPA. In homage to new The Hobbit movie coming out this week, I called it Old Took’s Midwinter IPA after Bilbo Baggins’ maternal grandfather, whose memory inspired Bilbo to embrace his adventurous side.
I brewed it on Black Friday in the company of my visiting male family while the ladies were at the outlet mall, which seemed like a great way to show my British brother-in-law (a pub operator who knows a thing or two about a good pint) how we do IPA here in the States.
The grain bill is below. I mashed at 152°F for an hour:
- 12 lbs 2-row malt
- 1.5 lb Munich malt
- 1 lb Victory malt
- 8 oz Crystal 40L
- 8 oz Crystal 60L
- 8 oz Rice Hulls (for efficiency & sparging)
But who am I kidding? The hops are what we’re really interested in here. First up, the oldies but goodies. I’ve noted both the original AA of all the hops below and the adjusted AA, based on BeerSmith’s calculations:
- 0.25 oz Nugget (12.4% orig AA, 11.4% adj AA) for 60 min
- 0.5 oz Saaz (3% orig AA, 1.84% adj AA) for 60 min
- 0.5 oz Falconer’s Flight (11.4% orig AA, 10.4% adj AA) for 45 min
- 0.5 oz Citra (13.6% orig AA, 11.73% adj AA) for 45 min
That was it for the old hops, and I kept them near the beginning of the boil. The reason being that if there were anything unpleasant about them after all this time, it was better to use them early on for bittering, instead of later in the boil when hops contribute more flavor and aroma. Based on my smell/taste tests, it probably would have been fine, but I didn’t want to take the chance.
I also used some fresh hops, mostly (but not all) after the 45-minute mark:
- 0.5 oz Warrior (16% AA) for 60 min
- 0.25 oz Cascade (6.2% AA) for 30 min
- 0.25 oz Willamette (4% AA) for 30 min
- 0.25 oz Cascade (6.2% AA) for 15 min
- 0.25 oz Willamette (4% AA) for 15 min
- 0.25 oz Cascade (6.2% AA) for 5 min
- 0.25 oz Willamette (4% AA) for 5 min
- 0.25 oz Cascade (6.2% AA) at flameout
- 0.25 oz Willamette (4% AA) at flameout
Measured and organized into each addition, all those hops made a pretty picture on my kitchen island:
My first photograph that’s a true work of art. I call it “Oscar Charlie Delta”.
The OG was 1.070 and I pitched 15.1 grams of rehydrated Safale US-05 yeast. I set the fermentation chamber to an ambient temperature of 63-66°F and it took off like a rocket within about 12 hours. It fermented very actively for about 8 days before settling down, and once I take gravity readings to ensure fermentation is done, I’ll add more Cascade and Willamette dry hops later this week.
If I had any doubts lingering in the back of my mind about using old hops, they were put to rest when I tasted the wort sample I took for my OG reading. It was sweet and biscuity, with a burst of multicolored floral/herbal bitterness, complex and layered as one might expect from so many hops. Tasting how much life was still left in those old hops, I was reminded of the last line spoken by old Bilbo Baggins in Peter Jackson’s film of The Return of the King when, aged and frail but still spirited, he looked out over the sea to the west and said, “I think I’m quite ready for another adventure.”
He who controls the spice …
I had to take a break from blogging last week due to the Thanksgiving holiday here in the United States, during which I played host to my in-laws for several days of family hijinks to the tune of college football, backyard-fire-pit s’mores, an Eddie Murphy retrospective on BET, and lots and lots of imbibed homebrew. I return with many stories I’ll share in the coming days: a rousing adventure of a non-traditional 3-course Thanksgiving beer dinner, and a saga of a Black Friday brew day so bitter it took six bowls to contain all the hop additions.
But first, an update on Colonial Progress Ale. After nearly 4 weeks in the fermenter, it’s just about finished with a gravity of 1.007. That’s a bit more attenuation than I expected, so it will be higher in alcohol, but that may not be a bad thing for a winter session ale.
I’m pleased to report that as the yeast slowly flocculates out, it’s leaving the beer with a much cleaner taste than I was getting from it even a week ago. When I sampled it on Thanksgiving, it was fruity and a little sulfuric. Now it’s clean tasting and very dry, with only a hint of mineral flavor from the molasses and a burst of herbal bitterness from the late spice addition of sweet gale and juniper berries.
What’s missing is any sign of herb or spice in the aroma/flavor arena. So today, a few days before kegging, I made a “spice potion” with the remaining sweet gale and juniper berries.
What’s a spice potion? Despite sounding like something from a Dune or Harry Potter book (or some sick and unnecessary crossover that I would nevertheless read because I friggin’ love both those series: Harry Potter and the Floating Fat Baron? House Elves of Dune? I’m looking at you, J.K. Rowling and Brian Herbert) a spice potion is a method for adding spices or herbs to homebrew without boiling – and thus losing many of the volatile compounds that give those ingredients their distinguishing features – and that’s more elegant than simply throwing them in the fermenter.
It’s simply soaking the herbs/spices in distilled liquor to extract the essence. As I understand it, this works because alcohol is a better solvent than water, so more of the flavor and aroma compounds are extracted than in water steeping, and no heat means the subtler characteristics of the ingredient are retained. And since it’s distilled spirit, it’s safe to add to the beer without fear of infection. Any spirit will do. Vodka is common because of its neutral flavor, but depending on the specific ingredient being extracted, I’ve heard of people using rum, tequila, or whiskey (whose name, incidentally, comes from the Gaelic phrase uisce beatha meaning “water of life”, which is also a solution of pure spice essence in the Dune series – and now we’ve come full geek circle).
I used vodka. And since quality isn’t really important for the small amount that will end up in the beer, I used the cheapest vodka I keep on hand: the stuff that comes in a 1.75-liter bottle for $9, which I use to fill my airlocks (never for drinking). I muddled a quarter ounce of juniper berries with a gram of sweet gale in a mortar and then placed it in a sanitized glass with about 2 ounces of vodka. The resulting mixture wasn’t pretty to look at, but had an herbal/tart aroma pleasantly similar to gin.
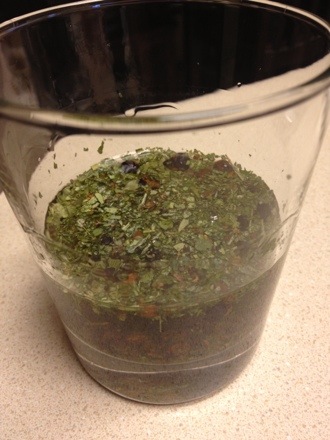
Only the Water of Life will free what can save us.
I’ll let the potion steep, covered with sanitized foil, from now until Sunday. Then I’ll strain out the chunks, add the essence to the keg, and rack the beer on top of that. Since the bitterness is already prominent in the brew, I think this is the last little flavor kick the beer needs to make it ready for prime time.
Watch this space for the next few days as I share my stories from Thanksgiving week. Since there’s no turkey or shopping involved in either of them, I’m sure you’ll enjoy them despite the passage of time.
Until then, keep the spice – and the beer – flowing.
Vote for Progress … hops
Saturday was Learn to Homebrew Day in the USA, and today is Election Day. To honor both events, I did what any patriotic and pedantic zyme lord would. I made beer.
I called it Colonial Progress Ale, and it’s something between an English bitter and an English brown ale. “Colonial” comes from the fermentables, adapted from a recipe I envisioned for a colonial-style ale during a trip to Philadelphia earlier this year. I ended up with:
- 6.5 lbs American 2-row
- 1 lb Victory malt
- 8 oz Flaked wheat
- 8 oz Flaked oats
- 1 lb Molasses
Each of these ingredients was chosen for a reason, starting with American 2-row malt as the base. Wheat is common in colonial ale recipes, including one attributed to Thomas Jefferson. Victory and oats I had no historic precedent for, but I added them for body in the finished beer, along with some bready/biscuity flavor (Victory) and silky smoothness (oats) to accentuate the English-inspired malt profile. I mashed at 153°F for medium fermentability, counting on the highly fermentable molasses to dry the beer out.
The mash begins.
Ohhh, molasses. A common ingredient in beer in early colonial Philadelphia (according to a quote from William Penn), I can eat the stuff right out of the jar. But I was nervous about using it after reading John Palmer’s tasting notes ranging from “rumlike” and “sweet” (woohoo!) to “harsh” and “bitter” (ergh). But further research online suggested that harsher flavors were associated with fermenting mineral-rich blackstrap molasses, not the regular unsulphured kind. I went with regular, and added them at the beginning of the boil with high hopes.
The “Progress” part came from the hops: one ounce of 6.6% AA Progress at the 60-minute mark for bittering, and another quarter ounce at 15 minutes for flavor. Progress is a UK varietal related to Fuggle hops, a good choice for English-style ales.
But that wasn’t all I added to the boil. Hops were available to some colonial brewers, but apparently not all that prevalent, so other bittering herbs were common. My original plan was to use horehound, but I realized the medicinal flavor might overpower a low-gravity ale. I thought of rosemary, but was talked out of it by the sages (ha, ha) at Austin Homebrew Supply. I landed on:
- .25 oz Juniper berries (crushed in mortar)
- .5 grams Sweet Gale (dried)
I added the herbs in the last minute of the boil and let them steep during cooling and whirlpool. I may add more later during conditioning.
The wort had an OG of 1.046, a true session ale for the upcoming winter (insert witty apropos Valley Forge reference; I can’t think of one). I pitched the slurry from a 2-liter starter of WLP008 East Coast Ale Yeast – reportedly the Sam Adams house strain – in keeping with the colonial theme. I set the fermentation chamber to an ambient 65-68°F, a little warmer than typical to coax some vintage ester flavor from this low-flocculating yeast.

Fermentation underway after 24 hours.
By this time tomorrow, the future of the United States will be written for the next four years. But regardless of whether my guy wins or not, I’ll have something to look forward to: a beverage in the tradition of the first beers brewed on American soil. Beer has always been a part of American culture, even before there was a United States, and from #1 on down to #44 many presidents have been homebrew aficionados: George Washington, Thomas Jefferson and James Madison were homebrewers and Barack Obama bought a homebrew kit for the White House with his own money. And beer remains one of the few things people can agree on regardless of personal politics.
Don’t forget to vote today, no matter who you’re supporting. Red and blue be damned. We can all party together in the colors of the SRM scale.
Getting Medieval with Ginger Mead
Anyone reading this blog regularly will notice that for the past few months I haven’t really been brewing. I’ve been out of the house a lot, so my homebrew stock hasn’t depleted. Brewing would just net me a backlog of new beer waiting to get stale, not to mention the challenges of brewing outdoors in the Texas summer heat. But now that fall is here, I’ve returned to brewing with a ginger mead from a new recipe. Because ginger is a spice, ginger mead qualifies as a metheglin.
The history/fantasy geek in me loves mead, and it’s hard to find in stores. Most commercial examples are too sweet, better suited to mulling and heating; and my desire to make good easy-drinking mead was a big part of my initial interest in homebrewing. And here’s the big secret: it’s really easy. Meadmaking offers some new challenges for a beer brewer, but the brew day itself is fast and straightforward, especially compared to all-grain brewing. My mead brew day takes 2-3 hours; beer brewing takes me 8 hours from setup to cleanup. There’s no missing mash temperatures. No stuck sparges. No boilovers. No boiling at all – the aroma compounds in honey are volatile and boil off quickly, and honey’s natural antimicrobial properties make sanitizing the must (the pre-fermentation mixture of honey and water) unnecessary.
Preparing a 5-gallon mead must is as simple as heating 2-3 gallons of water on the stovetop, just enough to dissolve the honey (around 110°F), and mixing that with top-off water in the fermenter. I used the 7.5-gallon aluminum pot that usually serves as my hot liquor tank:

In tonight’s performance, “Kettle” will be played by “HLT”.
I used bottled spring water – for no other reason except that I wanted to pre-chill the top-off water, and Target had it on sale. I’ve made great mead with filtered tap water in the past. I heated 2.5 gallons to 120°F while Lisa peeled and diced fresh ginger root.

Chopping action shot!
- 10 lbs Kirkland Signature Clover Honey (Costco store brand)
- 4 lbs Round Rock Honey (local premium wildflower honey)

Los Fermentables.

… and a sore right arm.
I racked this to my fermenter and topped it off to 5.25 gallons with refrigerated spring water. The must temperature equalized at about 80°F with an OG of 1.101. I’m targeting 1.005 FG for medium-dry residual sugar and an ABV of roughly 13%.
Meanwhile, I rehydrated 10 grams (2 dry packets) of Lallemand Lalvin K1-V1116 wine yeast in 2/3 cup of cooled boiled water with 12.5 grams Lallemand Go-Ferm rehydration nutrient. Unlike barley malt, honey is very low in nutrients yeast need to thrive, so adding nutrients to the must is … well, a must. I follow the staggered nutrient addition schedule recommended by a user named hightest on the board HomeBrewTalk.com, which calls for 4.5 grams each of diammonium phosphate (DAP) and Lallemand Fermaid-K nutrient at pitching, with additional nutrient additions later during fermentation (there’s tons of great information from this guy here – as invaluable as Ken Schramm’s The Compleat Meadmaker, which I’ve read cover to cover). I mixed the DAP and Fermaid-K into the must with a healthy beating from my drill-mounted aeration whip, pitched the yeast slurry, and shoved it into the fermentation chiller.
All this week, I’ll be aerating the must twice daily with the whip and adding additional yeast nutrients as necessary. Once primary fermentation is complete, I’ll rack to a carboy and age it for at least six months before bottling. I expect to have to add more ginger again for some additional spice after all that aging, which I’ll add directly to the carboy. If it finishes too dry, I’ll stabilize it and add some of the leftover Round Rock Honey.
Meadmaking is extremely rewarding, and a great step outside the box for any brewer. Even extract beer brewers can make mead easily with a minimum of additional equipment, unlike jumping from extract to all-grain beer brewing. And with so few meads available commercially, it’s a great way to share with friends this ancient libation so rich in history, and yet so mysterious to many.
Tapping the All-Galena Pale Ale
Today I kegged the all-Galena hopped American Pale Ale I brewed on the Fourth of July. That’s 7 weeks ago, a long time even by my standards. Due mostly to my day job, I haven’t had friends over nearly enough this summer, so I didn’t have a free tap until now. The Galena APA has been sitting in the primary in the Harry Potter closet all this time.
On the spectrum of anxiety over long rests on the yeast cake, I’m in the middle. I’m not one of those homebrewers who racks off the primary after a week, and I don’t usually secondary at all. But anything longer than 4-5 weeks and I start to get a little antsy. My inner critic kicks in and I begin scolding myself for letting my busy schedule and personal inertia destroy an innocent homebrew by allowing it to age past the terminus of perfection and into the sinister, uncouth dark age of spoilage. Then I get OCD about it. I sniff my hydrometer samples for the telltale “rotting meat” and “shrimp” aromas supposedly typical of autolysis. Once my fears are quelled, I leave it for a few more days, still fearing that the next time I take a sample, it will be too late.
Yes, I could just rack to a carboy after 4 weeks, but that would risk oxidation, which I consider a much more real and terrifying bogeyman than autolysis. I won’t rack unless I intend to age for a long time.
So I’ve been wary for a couple of weeks. But when I took the last sample before kegging, the beer didn’t smell like my Uncle Brian’s backyard during one of his legendary shrimp boils, so that was a good sign. It doesn’t taste like excrement either – huzzah, bullet dodged again.
But more interesting than this tiny conquest over beer-death (hey, I take the victories where I can get ’em) was the result of the dry hopping.
I added a half-ounce of Galena pellets (12.8% AA) a week ago. I always dry hop APAs and IPAs, but especially wanted to do so this time on account of the hop aroma lost during the long rest. Galena isn’t commonly used for aroma or dry hopping from what I can tell, but reports on the Interwebs had me expecting dark fruit aroma from the dry hops.
Those reports weren’t exaggerated. There’s a definite cherry/berry aroma here. It’s deceiving for a pale ale, as it doesn’t exhibit any of the notes we typically associate with “hop-forward” beers: not floral, nor herbal, nor citrusy. But it’s enticing. Coupled with the bready malt notes of the Munich in the mash, the beer ends up smelling a little bit like cherry pie, more so like a tart blackberry cobbler.
That isn’t coming through in the flavor, but I haven’t tasted it properly (i.e., carbonated and chilled) just yet. That first pint will be one for my personal record book, I’m sure. And I’m already thinking about other ways to use Galena as a late-addition hop: as a component in a late-hopped Belgian dubbel, paired with some Special B malt; or in a dry farmhouse wheat with a little bit of rye or mahlab – yeah, I’m still jonesing to use mahlab.
This could be the start of something unorthodox and awesome. You and me, Galena, we’re goin’ places.
