The quest for a quicker brewday
Wasting my time
Resting my mind
And I’ll never pine
For the sad days and the bad days
When we was workin’ from nine to five– Pink Floyd, “Biding My Time”
In February, a friend just starting out with extract brewing came over to observe my all-grain brewday. The hot liquor tank had just been fired up for the mash-in when he arrived at 10 a.m.. I mentioned casually that I would be working until about 5 or 6 p.m.. He looked at me in wonder and said something like, “Wow. I can’t imagine what would take eight hours.”
Of course, he was speaking from his experience with extract. Many all-grain brewers probably can imagine an eight-hour brewday. The mash and sparge – i.e., the very things the extract brewer doesn’t have to contend with – can easily add three hours once you factor in the time to heat water, vorlauf, etc. Not to mention time spent cleaning the extra equipment. But my friend’s curiosity got me thinking about whether I could be doing anything differently to speed up my brewday.
I was reminded of the article “Speeding Up Your All-Grain Day” in the March/April 2012 issue of Brew Your Own magazine by Dave Louw, which applied the Critical Path Method of project management to an all-grain brew day to find the shortest distance between Point A (setting up equipment) and Point Z (putting away clean equipment while yeast happily devour the meal you’ve set for them). The principle Louw applied was to identify the tasks that must be done sequentially and focus on those, working in the other required tasks while those are taking place. If you sanitize your fermenter while wort cools, you’ve got the idea.
By sticking to the Critical Path, Louw illustrates how an all-grain brewday can be begun and done in less than 4 hours, though his example is extreme to illustrate a point. There’s an abbreviated 45-minute mash. A no-sparge lauter. A 60-minute boil. All legitimate techniques, but not “my way”. Yes, my 60-minute mash, double batch sparge, and 90-minute boil make for a nearly nine-hour brewday – ten in summer thanks to slower cooling. But I get consistent results. And I’m happy brewing my way.
Was that the choice I was faced with? Between being happy and being fast? I set out to test this on a recent brewday.
NOTE: The following is about as scientific as I get. Unlike some of you homebrewers with backgrounds in engineering or chemistry, I’ve got a liberal arts degree in English and classical studies. I can’t build an Arduino-controlled HERMS system, but I can identify zymurgic puns in classic works of literature and explain the origin of the word “Saccharomyces”.
The brew was about as simple as it gets: a Maris Otter-Fuggles SMaSH ale. 9 pounds of malt and a handful of rice hulls, 1.25 oz of hops each at 60 and 15 and 1 oz at flameout, and Safale S-04. Nothing fancy, just a vaguely English fast-flocculating pale ale to fill an empty keg in 4 weeks. It seemed right for my experimental “rush brewday”.
I did everything I normally do – no shortcuts – but not wasting any time, either. At no time was I sitting on the porch reading a book and enjoying a beer or coffee. I did little tasks while the Critical Path was running: set gear up while water heated, measured out hops while the mash rested. During the boil I even got a head start on the one task that’s so unpleasant I usually save it until the end, or the next day: cleaning.
I didn’t stop. I was so busy going about the various tasks of my “rush brewday” that I completely forgot to hook up the iPod and listen to some Rush.
And I finished in six hours. My “Critical Path” looked something like this:
| Critical Path | Other Tasks |
| 11:00 | Setup pots, burner, etc. | ||
| 11:15 | Begin heating strike water | ||
| 11:25 | Mill grain | ||
| 11:45 | Preheat MLT with strike water | ||
| 11:50 | Mash in | ||
| 11:55 | Set mash timer for 60 minutes | ||
| 12:15 | Heat sparge water | ||
| 12:35 | Boil water for yeast rehydration | ||
| 12:55 | Vorlauf & first runnings | ||
| 1:05 | Begin batch sparge #1 | ||
| 1:20 | Vorlauf & second runnings | ||
| 1:25 | Begin batch sparge #2 | ||
| 1:40 | Bring kettle to boil | ||
| 1:57 | Set boil timer for 90 minutes | ||
| 2:15 | Begin cleaning | ||
| 2:45 | Prepare wort chiller | ||
| 3:25 | Sanitize thermometer for cooling | ||
| 3:27 | Start wort chiller | ||
| 3:58 | Stop wort chiller | ||
| 4:00 | Whirlpool cooled wort | ||
| 4:05 | Sanitize fermenter, hoses, etc. | ||
| 4:30 | Transfer wort to fermenter | ||
| 4:37 | Rehydrate yeast | ||
| 4:40 | Aerate with aquarium pump | ||
| 5:00 | Pitch yeast |
The one thing I should point out is that I did leave some of the cleaning for the next day. Just the mash tun and brew kettle, which I like to soak overnight with PBW anyway.
The beer isn’t in the keg yet, but it’s going to be great. I hit my target OG and FG perfectly, so consistency was achieved. And I did it all in six hours instead of nine. That’s a pretty definitive result (see note above re: “This is as scientific as I get”). But I was exhausted by the end of the day. And though of course brewing is always better than nine hours at the ol’ day job, my rush brewday was nothing like the relaxing experience I usually get as the other reward for my brewing labors.
And isn’t the fun why we do it? It’s why I do it.
So I’ve done some English-major-level science and answered my own question. Yes, for me it is a choice between happy and fast. And experience has cured me of my desire to brew faster. Don’t get me wrong, it’s great to know that by busting my ass, I can get a simple brew done in six hours and still have time to shower before leaving the house if I have evening plans for dinner … or whatever.
But unless I have to, I’m not gonna.
SMaSHy thing
HULK SMASH!! – orig. attrib. to Dr. Robert “Bruce” Banner, shouted by little boys everywhere
I recently took a break from my own frantic child-raising adventure to help my wife host a baby shower for friends expecting their first baby in October. The main request we got from the expecting parents was to make the event couples-friendly and laid back, with food, beverages and fun for the ladies and guys alike.
So in true Zyme Lord fashion, I decided to brew a beer.
I love having guests over to try my homebrew. It’s a great way to get objective feedback and improve my beer. This was a unique opportunity to reach beyond my closest friends – all of whom are already familiar with my homebrew – and get feedback from lots of people I didn’t know as well … most of whom I’ve worked with and gotten to know at other get-togethers, but who I hadn’t yet had a chance to have a beer with, let alone one of my own.
My kegerator was stocked with three kegs, but I wanted the special release beer to be the go-to tap. So it had to be something everyone could enjoy, regardless of their level of beer geekdom or personal style leanings. It should be in a popular and accessible style, and of course low-alcohol enough to keep the party family-friendly (it was, after all, a baby shower). I just didn’t know what.
Then one day when I was at the house of my expecting friends, flipping through the dad-to-be’s staggering collection of Hulk comics, the answer punched me in the face like a big green fist: I’d brew a SMaSH (Single Malt and Single Hop) beer in honor of one of my friend’s favorite comic characters.
I’ve made beers from a single malt and single hop before, but this was my first recipe following the SMaSH ethos: a platform to showcase the unique flavor and aroma of a single base malt and single hop (ideally added throughout the boil to reveal its bittering, flavor, and aroma characteristics). I designed my SMaSH as a pale ale, fermented with a clean, neutral yeast: full of flavor but easy drinking, interesting but not intimidating.
Also in true Zyme Lord fashion, I chose ingredients for symbolism as well as flavor. The grain bill was 10.5 lbs of Maris Otter malt mashed at 154°F for 60 minutes. I thought the nutty flavor of Maris Otter would be great unadulterated, and it was also a fun choice to commemorate the English ancestry of the growing family who were our guests of honor.
I also wanted to incorporate ingredients from Oregon and Maine, the two states where my friends have their roots. Oregon was easy. I used Willamette hops (4% AA), adding them as follows for just under 40 IBU:
- 2 oz at 60 minutes
- 1.25 oz at 15 minutes
- 1 oz at flameout
Finding an ingredient to represent Maine was tricky. I located a few boutique maltsters up there, but even if I could get them to sell me a single sack of grain at an acceptable price, I doubted I’d get it shipped in time. So I ended up breaking the SMaSH rules and adding a small amount of adjunct: 8 ounces by weight of Maine maple syrup, at the start of the boil. This was a minuscule addition in a 5-gallon batch; enough to add 2 tiny gravity points but no flavor. I added it for no reason really other than to say it was there – a technique I refer to affectionately as “KISS blood”. A little cheating was worth it to tell the story.
The OG was 1.058 and I pitched a single pack of Safale US-05 dry. Fermentation took off quickly thanks to a little yeast nutrient in the boil. After 15 days, it finished out at 1.010 for 6.3% ABV: not quite as sessionable as I was shooting for; but what the hell, the party was only three hours. I dry hopped with 0.75 oz of 4% Willamette for nine days.
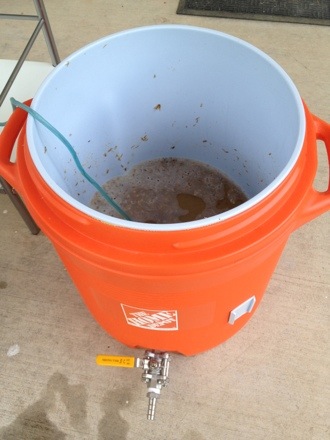
We served the beer frat-house style, with the keg in a bucket of ice. No pumps or picnic taps, though – this was the maiden voyage of my new portable paintball tank CO2 rig and post-mounted faucet from KegConnection.com.

Chilling in the chest freezer, before we moved it to the bucket.
As it turned out, the visual of a battered old Cornelius keg sitting in a bucket of ice with a hose hanging off one side and a tap handle mounted to the other was an excellent conversation starter. I spent a lot of the party talking about homebrewing and getting to know some friends better. As for the beer, it was smooth, just hoppy enough, and very refreshing. We went through 4 out of 5 gallons before the party was over, and some guests were inspired to try a flight of all four brews I had on tap in the house. A smashing success, I’d say.
See what I did there?
Vote for Progress … hops
Saturday was Learn to Homebrew Day in the USA, and today is Election Day. To honor both events, I did what any patriotic and pedantic zyme lord would. I made beer.
I called it Colonial Progress Ale, and it’s something between an English bitter and an English brown ale. “Colonial” comes from the fermentables, adapted from a recipe I envisioned for a colonial-style ale during a trip to Philadelphia earlier this year. I ended up with:
- 6.5 lbs American 2-row
- 1 lb Victory malt
- 8 oz Flaked wheat
- 8 oz Flaked oats
- 1 lb Molasses
Each of these ingredients was chosen for a reason, starting with American 2-row malt as the base. Wheat is common in colonial ale recipes, including one attributed to Thomas Jefferson. Victory and oats I had no historic precedent for, but I added them for body in the finished beer, along with some bready/biscuity flavor (Victory) and silky smoothness (oats) to accentuate the English-inspired malt profile. I mashed at 153°F for medium fermentability, counting on the highly fermentable molasses to dry the beer out.
The mash begins.
Ohhh, molasses. A common ingredient in beer in early colonial Philadelphia (according to a quote from William Penn), I can eat the stuff right out of the jar. But I was nervous about using it after reading John Palmer’s tasting notes ranging from “rumlike” and “sweet” (woohoo!) to “harsh” and “bitter” (ergh). But further research online suggested that harsher flavors were associated with fermenting mineral-rich blackstrap molasses, not the regular unsulphured kind. I went with regular, and added them at the beginning of the boil with high hopes.
The “Progress” part came from the hops: one ounce of 6.6% AA Progress at the 60-minute mark for bittering, and another quarter ounce at 15 minutes for flavor. Progress is a UK varietal related to Fuggle hops, a good choice for English-style ales.
But that wasn’t all I added to the boil. Hops were available to some colonial brewers, but apparently not all that prevalent, so other bittering herbs were common. My original plan was to use horehound, but I realized the medicinal flavor might overpower a low-gravity ale. I thought of rosemary, but was talked out of it by the sages (ha, ha) at Austin Homebrew Supply. I landed on:
- .25 oz Juniper berries (crushed in mortar)
- .5 grams Sweet Gale (dried)
I added the herbs in the last minute of the boil and let them steep during cooling and whirlpool. I may add more later during conditioning.
The wort had an OG of 1.046, a true session ale for the upcoming winter (insert witty apropos Valley Forge reference; I can’t think of one). I pitched the slurry from a 2-liter starter of WLP008 East Coast Ale Yeast – reportedly the Sam Adams house strain – in keeping with the colonial theme. I set the fermentation chamber to an ambient 65-68°F, a little warmer than typical to coax some vintage ester flavor from this low-flocculating yeast.

Fermentation underway after 24 hours.
By this time tomorrow, the future of the United States will be written for the next four years. But regardless of whether my guy wins or not, I’ll have something to look forward to: a beverage in the tradition of the first beers brewed on American soil. Beer has always been a part of American culture, even before there was a United States, and from #1 on down to #44 many presidents have been homebrew aficionados: George Washington, Thomas Jefferson and James Madison were homebrewers and Barack Obama bought a homebrew kit for the White House with his own money. And beer remains one of the few things people can agree on regardless of personal politics.
Don’t forget to vote today, no matter who you’re supporting. Red and blue be damned. We can all party together in the colors of the SRM scale.
Strike up the Sousa march …
This Fourth of July, I celebrated my right to make beer. Regular readers may recall that a few months ago, I posted a recipe for an American Colonial Ale inspired by a recent trip to Philadelphia. The perfect beer to brew on the Fourth of July! But silly me, I forgot all about it until after I left Austin Homebrew Supply with my ingredients for a different beer. So I’ll have to brew the colonial ale another time. Oops …
Instead, I brewed a single-hop Galena American Pale Ale, the second in my “Misty Mountain Hop” series of single-hop brews (the first was a Citra APA). This was a new grain bill entirely of my own devising, and if the beer comes out well, I’ll probably make it my standard grain bill for all APAs from now on:
- 9 lbs 2-row malt
- 1.5 lbs Munich malt
- 8 oz Crystal 40L
- 8 oz Crystal 75L
The wort looked and smelled delicious coming out of the mash tun, a sort of tangerine-copper color with an aroma like toasted artisan bread. I’ve got high hopes.

Vorlauf action shot!
The hop additions were all Galena, of course. This common bittering hop doesn’t seem to be used often for late hop additions, but I’ve read reviews of a few beers with late Galena hops that had descriptors like “dark fruit” and “tart berry”. Sounds awesome to me. I used:
- .85 oz at 60 minutes
- .5 oz at 15 minutes
- .5 oz at 5 minutes
- .5 oz at flameout
All of my Galena hop pellets were rated 12.8% AA. I’ll probably add another half ounce of dry hops before kegging for added aroma. My OG came in at 1.055, pretty much smack in the middle of the BJCP range for American Pale Ales. I pitched 15 grams of rehydrated Safale US-05 yeast.
But my real declaration of independence this brew session was from my old swamp cooler. After long deliberation (and somehow, writing about the idea a couple of weeks ago made it seem more feasible – thanks, Internet!) I finally bit the bullet and got myself a true temperature-controlled fermentation chamber: a Kenmore 5.1 cubic foot chest freezer with a Johnson Digital Temperature Controller dialed in to a range of 65-68°F.

Crazy. Sexy. Cool.
The Galena APA has been in there for a few days, and I’m still working out the kinks. Last night after I was out of the house all day, it had somehow got down to 60°F, though it was back up within minutes after I cracked the freezer lid for a while. But I can already say that this is one of the best purchases I have made in support of my homebrew habit. Ever. No more checking the closet every hour to monitor the temperature. No more keeping dozens of frozen water bottles on hand, waiting to be used in the swamp cooler, spending their idle time rolling around my garage freezer and making it harder to find more important stuff (like, you know, food). Perhaps most importantly, no more risks of infection from the stagnant water in the swamp cooler, which always bothered me. I just let it do its thing, check it once or twice a day, and it’s always been in the range I want … except for last night, but it’s never gotten higher than 68°F.
And now I am at liberty to brew what I want to brew, any time of year. I can lager in August. With a few modifications, I can make warm-fermented fruity Belgians in February.
Freedom. I dig it. Don’t we all?
